Saturday, November 1, 2014

Votive Church Shrine Kits and More Christmas‏


New Goodies!
  
Happy Saturday Everyone! I'm really excited about our brand new Votive Church Shrine Kits. I've been wanting to design them since our Votive House Shrine Kits last year! Yeah, they are finally here! We have TONS of new goodies to alter them with too. I'm a sucker for bottle brush trees and tiny deer. In addition to the new goods, the general Christmas Section has over 600 fabulous goodies (all on sale) and our Coffee Break Design Christmas Section is sure to inspire.


Votive Inspiration!

I love our Votive House Shrine Kits and I think I love our brand new Votive Chuch Shrine Kits even more. Of course you can combine them both to make sweet village. I could definitely see these on a fireplace mantle. And they make fantastic ornaments too! Here are a few of the House Kits all decked out to give you some ideas!

The above and below is by Design Team Member Linda Cain! More info on Linda's blog here.


By moi! As you can see, they look amazing with or without votive candles!


Inspiration By Rhonda K. Cruise!
  
This stunning Halloween Doll is by Rhonda Cruise! How fabulous is that lace!


Inspiration By Gerri Herbst!

Design Team Member Gerri Herbst created this fun Halloween card. I think it's ingenious the way she used the Falling Star ATC Frame! She also used our Fairy Doors Collage Sheet, Skeleton Paper Cut, and Collage Sheet CV48.


Inspiration By Linda Cain!

I'm loving this gorgeous Cameo Frame created by Design Team Member Linda Cain! Linda has some amazing tips for you on her blog. Find out about the new Finnabair Crackle Paste and much more here. Thanks Linda!


Inspiration By Kelly Hoernig!

Want to join Kelly Hoernig for some HALLOWEEN HIDE & SEEK?
TREATS INCLUDED! Kelly has a free project PDF for you. We love how she used our Victorian Frame Ornament! Get your free PDF here.


Inspiration By Aideen Fallon!

I wanted to share this cool video with you, created by Aideen Fallon! Aideen recently used our 3-D Witch Doll, and she did a fantastic job! And I Ioved what she had o say about it. Check out the end to see some amazing texture on the back and sides of her shrine. She'll tell you how she did it! You can watch the video here. Thank you so much Aideen!


Inspiration By Tristan Robin Blakeman!

Happy Dia De Los Muertos! That's right, Day of the Dead is officially today and tomorrow, November 1st and 2nd. This beautiful album created by Tristan Robin Blakeman is the perfect homage to the holiday! Tristan used our Exquisite Shrine to frame Frida. So perfect Tristan!


Fun 2014 Christmas Tutorials!

The delightful Deer Mount Ornaments from a few weeks ago are posted to our blog so you can access the step-outs anytime. Find it HERE


And of course the fun and funky angels from last week are also posted. I'm really itching to make more of these! You can find the tutorial HERE.


Since it snowed yesterday here in Indiana, it's starting to feel more like Christmas. That's right, it snowed on HALLOWEEN! This photo is from around 8pm last night!


Snow or no snow, I'm definitely excited about Christmas. A few weeks ago I ordered some fairy lights and had the perfect idea for them. I added them to my lovely vintage bird cage, and then recently added my angels. A few bottlebrush trees, and I'll be all set. I'm really happy to have fairy lights in my studio again. Starting to feel at home! xoxo

Saturday, October 25, 2014

Primitive Angels and Fun with Clay and Molds‏


New Goodies!
  
Happy Saturday Everyone! I'm so thrilled with our new Primitive Angel Art Doll Kits! Though the bases are "primitive", the design possibilities are anything but! Things all started with a customer request for Primitive Angels, and I ran with it! They were fun to design and even more fun to play with! In addition to the new goods, the general Christmas Section has over 600 fabulous goodies (all on sale) and our Coffee Break Design Christmas Section is sure to inspire.


Art Time!


Even though they are "primitive" my inspiration was to make them fun and funky! My main focus was the heads. I wanted to do something different for each, something more asseblagey (yes, I know that isn't a real word.. grin). So that I where I started. And then I just winged the rest as I went along (pardon the pun!). The heads of the dolls are larger, and much more round then the heads of our other dolls making them perfect for assemblagey things. You can still use the Doll Head Paper Cuts on them, but I wanted to challenge myself a bit. My first challenge was using clay and molds for the first time! Something that proved to be a piece of cake! Really! I've wanted to try it for so long, and it was a breeze.


Initially, I thought I would use Paperclay, which would definitely work too. But then I noticed the long drying time so I went with the Sculpey. Taking it out of the package, it was pretty soft. I've always heard of "conditioning" clay, so I did smush it around for few minutes. Probably not necessary, but doesn't hurt either. I tore off some clay about the size of my first mold cavity and simply pushed it in using my thumbs. I think it's best to add more than necessary, and then subtract as needed. I didn't  want any hanging over. You can add or subtract clay as needed without trouble. The stuff is so easy to work!


Once my cavity was full, I found it very handy to push the back down on a flat surface. This gave me a nice, smooth cabochon back!


See, nice and flat. Then I just popped it out of the mold. It came out no problem!


I loved that the clay was not so soft that I felt like I would ruin it or smash it. And yet was still pliable enough to make any necessary changes. It was just right!


Once I saw how easy the process was, I made several more. Remember to push the back on a flat surface before popping them out! I was so happy to figure that out!


Finally bake for 12 minutes as directed on the package. I simply put mine on a paper plate. Not certain how "safe" that is, however I kept a close eye on them. And they came out perfectly.
Chris called me while they were cooking and I had to laugh after I told him "I'm baking faces." He didn't even sound surprised or question it. Ha!


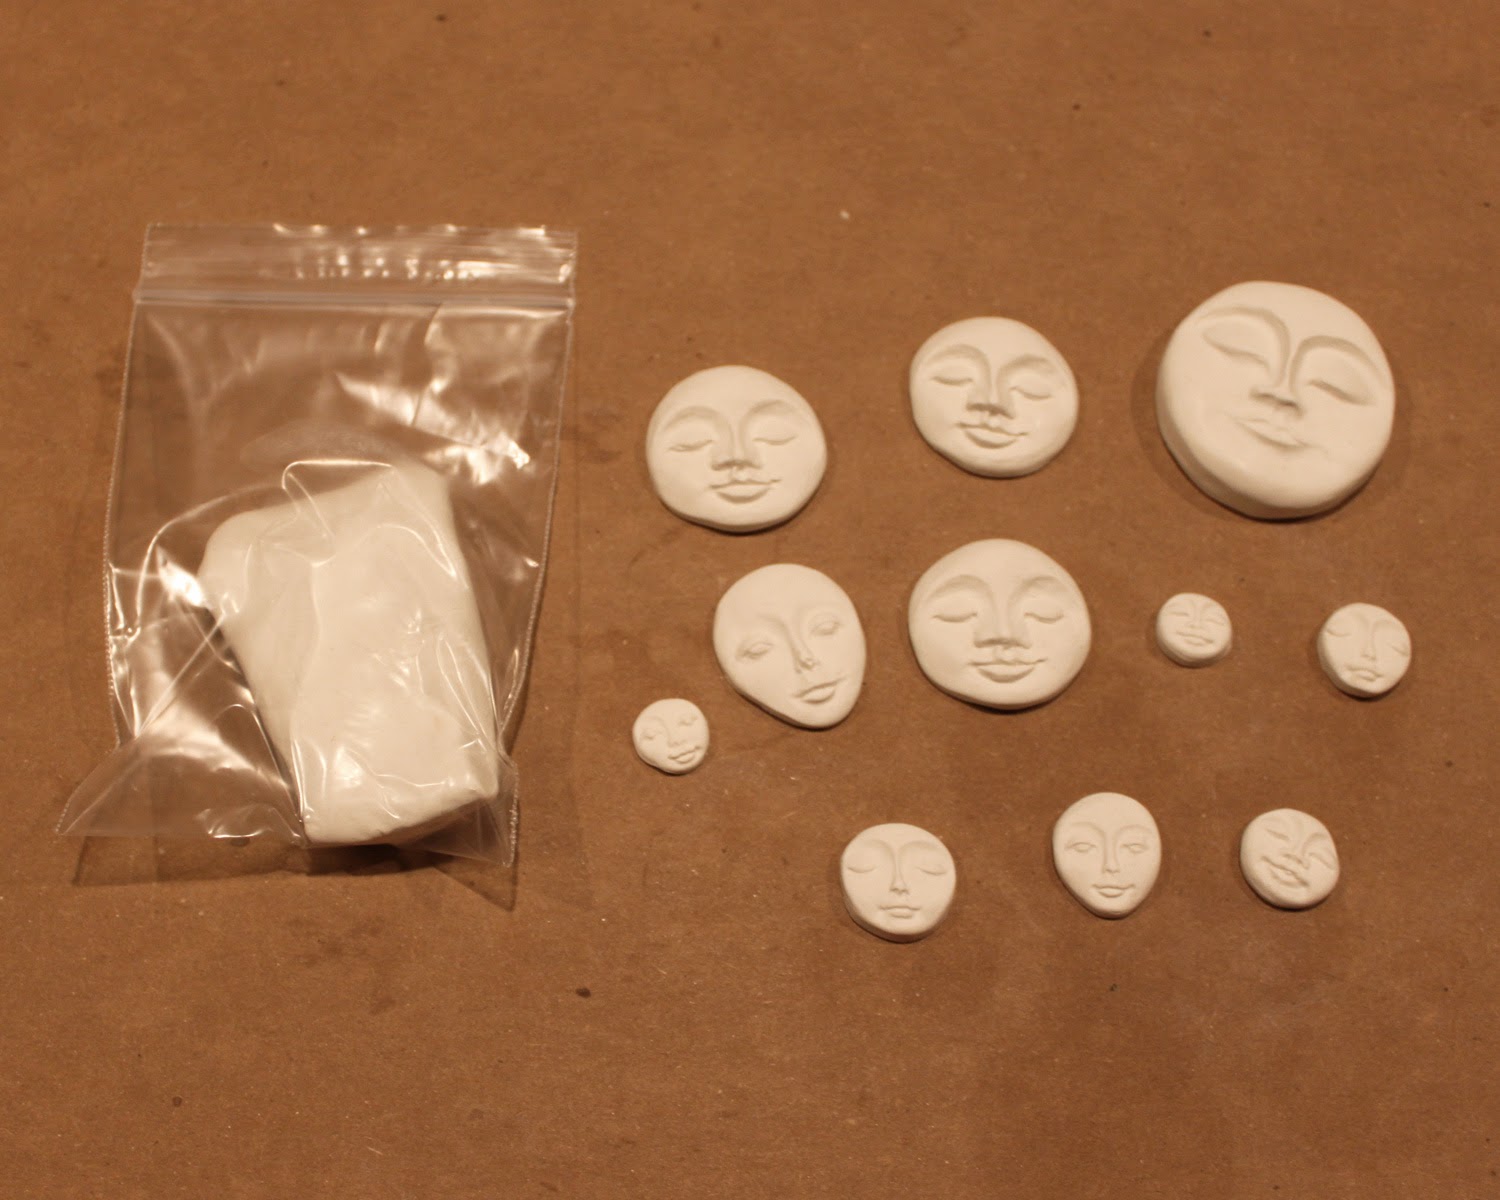
Here are my final faces baked and ready to go. I put my extra clay in a baggie. For under $2 in clay I made several cabochons and had more than half left over! I was especially impressed by how SMOOTH the Sculpey was before and after baking. Not a single crack or craze. I can wait to use it again!


My next step was to plan the other two heads. I used a vintage bottle cap with a 25mm clear cabochon for one, and one of the flowers from our Flower Pin set for the other. Also with a 25mm clear cabochon. I ended up using some Doll Head Paper Cuts afterall, but in a different way. I attached the clear cabs using Diamond Glaze, and once dry, cut them out and assembled them. To finish the clay face, I painted it with gold acrylic paint and added a bit of Inka Gold. The paint covered the clay beautifully with one coat.
Remember those glasses from last week that I didn't end up using? They were PERFECT for my little clay face! Squuueee!


Once the heads were done, I covered the bodies and wings with vintage music sheets that a friend gifted me. Thank you Melodee!!! I used Matte Glue N Seal.


I added color to the wings with my Peerless Water Colors and added strips of the Retro Grunge Collage Sheet to my Angel Bodies. Then of course trimmed and sanded them up.


I was tempted to do my usual inked edges, but in the spirit of trying new things, I added outlines with my Signo pens instead. Check out the "shoes" and "socks". Adorbs!


 Finally I assembled the rest of the bits and attached some silver wire! Other than the heads, I didn't really have a plan but somehow it all came together, and I'm in love with them! I can see how the Extra Large Dolls (some are 12"!) would be real show stoppers! Big or small, they are huge fun!


Inspiration By Diana Darden!
  
And for some Halloween Doll fun, check out this amazing Witch by Diana Darden! I love the fun pop art look she has going on. Fabulous piece Diana!


Inspiration By Gerri Herbst!

Design Team Member Gerri Herbst created this fabulous Poe inspired card. Eerie indeed Gerri!


Inspiration By Kim Rayko!

I'm loving this Spooky Theatre created by Kim Rayko! So many amazing bits to look at. Awesome job Kim!


Inspiration By Amy Nieman!

This sweet Dollie Shrine Ornament is by Design Team Member Amy Nieman! Proof that Halloween doesn't always have to be scary. Sometimes it's adorable! Love it Amy!


Deer Mount Ornaments!

The delightful Deer Mount Ornaments from last week are now posted to our blog so you can access the step-outs anytime. Find it HERE.


More Angel Inspiration!

I hope you enjoy playing with our new Primitive Angel Art Doll Kits! I know I had a blast!
For even more Angel inspiration, you can check out our swap photos from last year on Facebook. The angels are different of course, but they may give you some fun ideas!
xoxo Kristin

Saturday, October 18, 2014

Delightful Deer Ornaments and More Christmas


New Goodies!
  
Happy Saturday Everyone! I'm so excited about our new Christmas goodies. I had a chance to play with them, and I'm totally in love. I'm sure you'll love them too. I know it's not even November, but after my time in the studio I'm definitely in the Christmas mood. In addition to the new goods, the general Christmas Section has over 600 fabulous goodies (all on sale) and our Coffee Break Design Christmas Section is sure to inspire.


Art Time!


These ornaments were so much fun to make, and would make excellent gifts! Handmade gifts are the best. I'll go through my steps below. Please excuse the lovely mess!


First, I covered my plaques with Christmas paper. Trace around the plaques on the back of your paper, cut out, then attach with Glue N Seal. You can file the edges for a perfect fit. I added some stenciling for texture. I used the Flourish Stencil and Sepia ink, applied with an ink blending pad first.


Love the look and it's super easy.


Next I used the Onomotoholes stencil. Using a sponge brush I applied white acrylic paint.


Once my stenciling was done, I inked my edges with black and sepia ink.


The next step was preparing my chipboard embellishments. I knew I was going to cover them with stickles. A great tip is to paint them first in a coordinating color. That way you don't have to be exact with your glitter glue and it makes the pieces really pop! I used acrylic paint.


I covered my pieces with Stickles next. As much as I love getting messy with loose glitter, sometimes Stickles are a nice change. No mess and gorgeous sparkle! I love the way the reindeer turned out. I don't normally leave the Masonite raw, however it definitely worked with these pieces! I did ink the edges of the deer with black ink to add some "shadow". And of course glittered the antlers!


The ornament holes are the perfect size for standard eyelets. Fun tip: standard eyelets are the perfect length to GLUE IN to the Masonite. Simply glue them in and done. They look perfect and provide a nice, finished look.


Once my eyelets were set with the glue, I attached my tinsel stems. I love these thin versions. They are wired, so just wrap the ends to secure.


If you want a fun, quirky look, you can add the included accessories to your ornaments. The deer looks so cute with the glasses, however I didn't end up using them this round. I went with more of a classic look, but still wanted to show you!


So there you have it! Three wonderful gifts ready to go!


Inspiration By Karen Hendrix!
  
Back to Halloween for a bit! This amazing Pumpkin Doll is by Karen Hendrix! I truly adore the color palette she used. And of course the spider webs. So stunning Karen!


Inspiration By Lynn Stevens!

This spooky little Coffin is by Design Team Member Lynn Stevens. Doesn't he look cozy?


Lynn also created these elegant masked Marie ATCs. What are you wearing for Halloween?
Fantastic creations Lynn!


Inspiration By Lisa Rupp!

I'm loving this Victorian Witch Shrine by Lisa Rupp! How perfect to transform the niche into an apothecary cabinet. And check out those spiders and skulls. This shrine is the perfect mix of Halloween, Steampunk, and Dia De Los Muertos. Three of my favorite things. Awesome Lisa!


Inspiration By Doghead Smith!

Doghead Smith posted this fabulous Carousel on our Facebook page and I had to share. As she stated, her carousel was inspired by Lynn Steven's Scary Go Round. How wonderful to see the inspiration! This display is so magical too!


Tombstone Swap!

Thanks again to everyone who played in the Tombstone Swap. I loved seeing all of the returns popping up on Facebook. That's my favorite part - seeing them in their wonderful new homes.
I recently added all of the Tombstones to Pinterest for those of you not on Facebook. You can check them out here.

 or on Facebook here: http://ow.ly/CtMJV

Awesome Tombstones above by Constance Taylor!


Christmas is Coming!

After my time in the studio this week, I'm getting excited about Christmas. I even ordered some Fariy Lights for the studio this week. My old studio had lights (year round), and it doesn't feel the same in the new studio without them. There is just something so magical about the warm glow. Just like in the photo below. Those are my Votive House Shrine Kits from last year. Still a favorite. I hope you're excited about Christmas too! Oh, and Halloween goodies are 20% off this week so it's a great time to stock up. I know some of you partake year round! xo Kristin