Saturday, April 26, 2014

Queen Bee Doll Kits and other Buzz Worthy Goodies‏


New Goodies!

Happy Saturday everyone! The weather around here has been BEE-u-tiful and now I'm dreaming of summer! As soon as I typed "Queen Bee" in last week's newsletter I knew what I had to do next. I'm sure those of you that follow me had an idea too! QUEEN BEE DOLLS! Yep, and she's sweeter than honey if I do say so myself! The perfect addition to our extensive Art Doll Kit section! We also have new Tim Holtz Stencils, More Gilded Life Bezels, and a few other goodies to pollinate your creativity!


Art Time in my Hive! 
 
I had an absolute blast with miss Queen B.
Warning, this Newsletter may contain a copious amount of bee-related word plays! One of my favorite customers sent me lists and lists of them, some of which I will share with you below. But back to the art. I'll share a few tips with you.
Bee Calm and Art On!


I started Miss B. by painting her entire body with gold acrylic paint. I wanted to stencil her back, so I used our new Small Honeycomb Stencil. TIP: These stencils work more like masks, so you have to plan your colors ahead of time. I wanted the inside of the cells black and the borders gold, so I painted the body in gold and stenciled the cells in black. Or you can do the reverse!


The best thing about this new stencil is that the pattern is repeating. Stencil not long enough, no problem.


After you have stenciled to the bottom simply lift up the stencil and line the top row up with your last row of paint and continue! You can do the same for the sides. So this stencil can cover any piece, no matter how large! It also looks great when you just stencil small parts here and there!


Her "skirt" is especially great because depending on how you alter, it can look like a beehive OR a bee body! Or a little bit of both like in the art sample. The top layer of her "skirt" comes in pieces, so you can alter each segment separately, making altering a snap. I love how I was really able to ink up the edges of each piece. Really added a lot of dimension! I had fun picking two papers that were vintage, yet had the obligatory yellow and black. Sort of a modern interpretation. 


I wanted lots of texture on the wings, and I wanted them to resemble veins, like you would see on insect wings. First I painted my wings black to add contrast then I attached my lace with Glue N Seal added liberally. Once dry, I trimmed and inked my edges. You could also use Cheese Cloth for this! Just Bee sure to pull it apart a bit. 


Finally I attached some embellishments and set her in the optional Honeycomb Stand! It's like a little bee docking station. You can remove her as you wish! I especially love the look of our new Chipboard  Honeycomb Bits. Handy little things that you can used just about anywhere. You can cut the pieces apart as needed too. 


These gals will get your wings a-buzzing! And if you're not sure where to start, just 'Wing It!'
Don't worry bee happy!
I just realized that our New Honeycomb ATC Door Shrine Kit would make a great Wardrobe Closet for your new Queens! 


As I mentioned earlier, one of my customers had fun sending me clever "Bee" word plays, some of which are probably above! She prefers to remain anonymous, but she knows who she is. Here are a few of my favorites that I thought I would share. Courtesy of Queenteena.

"Honey, BEE sure to COMB your hair!!"
"Hive been busier than a bee!"
"Hive More BEEs for You, so You Can BEE More!!!"
"Easy-Beezy!"
"Bee UTEE!"
"Do you have a bee in your bonnet to try out ..."
"BEEmail me"
"To Bee or not to Bee"
"Easy as A, BEE, C!"
"Bee Adorned and You'll Bee Adored!"  
  "Let your Inner Nectar SHINE!"
"Just Bee!!"
"Show your Inner Queen BEE"

And those are just a few from the emails that kept me entertained all week! Hope they made you smile too! 'Pure Gold'


Inspiration By Danene Grillo!

I just love this awesome mixed media canvas by Danene Grillo! Hard to believe she did the entire piece using just one of our stencils, Bus Stop Mania! Lot of great twists and turns of the stencil for sure. Danene just started her first blog, so be sure to stop by and say hi! Danene is very talented so you are sure to see lots of great art pop up there. Thank you Danene!


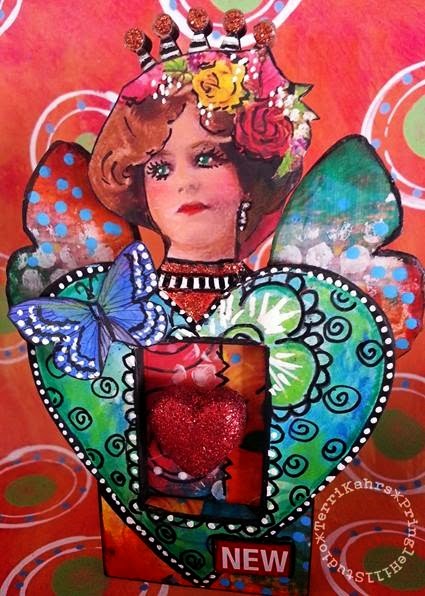
Inspiration By Terri Kahrs!

Could this Sweetheart Fairy be anymore gorgeous and colorful? She was created by the talented Terri Kahrs! I adore Terri's bright and happy style. Just scrolling through her blog makes me happier! Thank you Terri!


Inspiration By Lynn Stevens!

Design Team Member Lynn Stevens created this awesome Mini Santos Doll. Lynn also used our Mini Doll Head Paper Cuts, Small Wheel Set, Wing Collage Sheet, Bird Cage, Nest Charm, Bird Word Paper Cuts, and Gear Cut-Outs. I'm not sure how I lived life before seeing a Frida Santos on wheels! SO creative Lynn! I heart her so much!


Inspiration By Linda Cain!

This super cool Tower Shrine is by Design Team Member Linda Cain! I adore how she painted and placed the Letterpress Blocks and OH MY that roof! Can you guess what she used? Our Small Stencil Board Strips. How brilliant is THAT! They certainly aren't just for stenciling! 
You can see more amazing step-out photo and instructions on Linda's blog here.


Saturday, April 19, 2014

Queen Bees, Triptychs, and More


Happy Saturday everyone! After last week, I was still feeling a bit Regal, so we have some lovely new goodies in the shop including Shelf Shrine Triptychs, an Art Queen Shrine Kit, a Queen Bee Ornament, and lots of awesome Cut-Outs. Oh, and fittingly, the lovely Gilded Life Pendants and Bezels are in the shop!


Art Time!
 
I hope you are all having a blast with our Regal Chipboard Crowns from last week! I know I'm still admiring mine. I also discovered that they would "fit" my little miniature pinscher, Zeus. A photo shoot may be in order one of these days!
I absolutely LOVED working with our new Queen Bee Ornament. I have a few photos and tips to share below. And keep in mind, the techniques can be used with any of our Cameo Frame Ornaments.
Are you the Queen Bee of your hive? Of course you are!


I loved working with this color palette. A bit different for me, but the first thing that came to mind when thinking about bees, was black and gold.


I started by painting my frame, bee, and back with black acrylic paint. The black went on quickly and smoothly and only required on coat. I should use black more often!


After the paint was dry, I selected my paper for the inside of the frame. There were SO many of the Land of Enchantment Collage Sheets that would have looked great, so it was a tough choice. Using a Micron pen, I doodled around the frame. My doodle also served as my cutting lines. I simply cut the oval a bit larger and then glued it to the frame after I completed my embossing (see below).


I wanted a distressed/gilded look to my frame and bee. I coated both pieces using my Embossing Dabber, and then simply sprinkled on some Gold UTEE. I purposely added more on the crown area. Finally, I heated with my heat gun and then glued the pieces together.


I was lucky enough to have some stunning amber vintage rhinestone chain in my bling treasure box!


I love discovering forgotten items in my bling box! The amber stones were just the thing to finish off my piece. You could also use our Gold Faux Rhinestone Mesh in place of it.


I really want to play with our Art Queen Shrine Kit next! I can already see the crown covered in crystals. Perhaps some Dresden around the box. And that perfect word in the center of the crown!


More UTEE Fun By Linda Cain!

Design Team Member Linda Cain has been playing with UTEE too. For more instructions and a complete supply list, check out Linda's Blog post HERE.
I love her soldered look without the solder!


Inspiration By Diana Darden!

Last week I shared a Stand Up Steampunk Cameo Man by Diana Darden! Well, this week we have his Lady! What a Steamy couple they are! Thank you Diana!


And in honor of Easter, here are some stunning Ornate Eggs by Diana Darden! I love the jewel tones she used. Perfect.


Inspiration By Marie Garot!

This lovely Bird Cage Doll is by the talented Marie Garot! She also used our 25mm Clear Cabochons, Angel Wing Cut Outs, Santos Doll Head Paper Cuts, Classic Brass Crowns, and Gold Embossing Powder. The entire piece is amazing, but my favorite part would have to be the fibers. For me, it mimics the look of "feathers" and I love the texture they add! Beautiful Marie!


Inspiration By Linda O'Connor!

Linda O'Connor is at it again with another amazing Santos Cage Doll. This is Saint Barbara, and she is exquisite. I adore the antique spray nozzle she added to her skirt. You can read more about Barbara HERE on Linda's Blog. Linda's blog is awesome, so check out her other posts as well!


Thank you so much for sharing Linda O'Connor! She's wonderful.


I wish you all a very Happy Easter!
xoxo Kristin


Saturday, April 12, 2014

Regal Santos Crowns and More‏


New Goodies!
Happy Saturday everyone! I'm extra excited about the new goodies this week. They are very unique and different and I had a blast designing them! I'm sure much of my inspiration came from the fact that my favorite show, Game of Thrones, is back on T.V. We also binge watched season 3 just before the new season aired. Not to mention the online restoration of an old 1800's Chateau in the heart of France I've been following! So I give you Regal Chipboard Santos Crowns, a fabulous Santos Doll Box Kit, and some Regal Stencil Board bits for those die hard Coffee Break Design Stencil lovers. I didn't forget about you!


Crowning Around! 

I'm absolutely enamored by the new Chipboard Crowns! Inspired by my latest obsessions. So I decided to play with all three. I wanted them to all have a metal look, and yet, challenge myself to use different techniques for each. I'll share a bit of the process below. The sky really is the limit with these!


For Crown 1, I went with a Verday Paint Finish. I used the Gold for the base and Iron for the top coat. I wanted a rusty look.


Tip: When working with the Verday paints, I try not to let any go to waste. So I grabbed our new Halo Cut Outs, and used my extra paint. If you're already painting and spraying, you might as well work in a few other bits. Now these are all set to go for another project!


For Crown 3, I used Viva Copper Crackle Paint, direct on the raw chipboard. It worked great! I love this color!


Crown 2 is pretty detailed, so first I sprayed it with Silver Spray Paint. This caught all the wonderful filigree.


I added some Viva Silver Crackle Paint in certain areas, and then once dry, a bit of Alcohol Inks for "texture".


I gave Crown 3 a bit of Inka Gold (Hematite and Turquoise) around the edges. I love all three "metal" looks. INKA GOLD TIP: This is a good one folks. Over time, Inka Gold can become dry. To prevent this, and/or to rejuvenate a dry pot, store with an unscented baby wipe inside. This will keep it moist. Simply replace the baby wipe once it dries. This really works people! Mine is always baby soft :).


Next up, my favorite part. EMBELLISHMENT! I pulled out a few of my bling boxes and went to work. If you are like me, this photo makes your heart beat a little faster.


The gorgeous large bit of bling above is actually a brooch. Pinned right around the chipboard. I can change it out if desired!


I plan to display all three on my fireplace mantel. Or perhaps one of my composition dolls is in need of a crown! Of course if I ever manage to grab an antique Santos Doll, she has first dibs! 


And for those of you who love beauty and function, I give you this unique Santos Doll Box Kit! She's quite lovely, AND can hold your treasures.


As you can see, she can hold lots of ATCs, or anything else you might desire! I love how you can see the ATC peeking through from behind her cage skirt. I hope to find some art time to play with her as well!


Inspiration By Diana Darden!

I just love this Stand Up Steampunk Cameo Man by Diana Darden! Often when I'm designing, I imagine how a finished piece might look! Diana captured that vision and MUCH more! Thank you Diana. Awesome!


Inspiration By Amy Nieman!

Design Team Member Amy Nieman created this bright and happy collage using our Sun Frame Cut Outs, Collage Sheet CV24, Flourish Stencil, Mini Gold Scalloped Dresden, and more. This stunning piece makes me think of Summer and the lovely warm months to come! Thanks for the happy Amy!


Inspiration By Lynn Stevens!

These peat pots by Design Team Member Lynn Stevens are just adorable. Lynn used our Egg Cut Outs, Bird Word Paper Cuts, Fences, and several of our Spring Collage Sheets. Beautiful job Lynn! I love that these can work for Easter and Spring.


This stunningly beautiful Large Santos Doll is by Luci Brito! I love how she also tucked our Chipboard Towers inside her skirt and used the Gear Head Collage Sheet for her face! I can always spot Luci's work by her gorgeous handmade paper flowers. I'm a lucky girl to own several of her original pieces. They are even more amazing in person. Incredible Luci!