Saturday, December 10, 2011

Recycled Gift Packaging And a Few More Handmade Gifts


Last week I showed you some handmade gifts I created so I thought it would be fun to show you how I packaged them. I mostly used recycled materials. The small pieces worked great in some Altoids Tins I had been saving. For the kraft packing, I simply took some brown packing paper recycled from a package I received and ran it through the shredder. LOVE the simple look of this.
.....................................................................

 For these sweet tags, I punched out parts of an old Christmas card using a scalloped punch and then punched a hole. The card was glittery and sparkly, which made for really cute tags!
.....................................................................

Believe it or not, I was actually out of ribbon, however I did have an old lace curtain laying around. I cut strips from the curtain and used them to tie up the tins. I really loved the frayed look of the lace. I added my punched tags from above, and done! And the packaging didn't cost me a thing!
.....................................................................

I really like how they turned out. Ready for gift giving!
  .....................................................................

You could also add one of our Masonite Snowflakes to the package for a sweet touch. You can order them with charm holes so all you have to do is attach them to the ribbon with a jump ring (like I did) or tie them to the ribbon with a piece of string.
.....................................................................

My "earring tree" was too large for the Altoids tins, however I happened to have a gingerbread house tin that I have been saving forever. Perfect! I also tied it together with my lace ribbon and added a recycled tag.
.....................................................................

And a few more handmade gifts. I posted about this heart ornament earlier. To create the ornament I used Large Heart Ornament Parts (I layered a solid back, open frame with charm loop, and then an open frame), Heart Key Charm, Patina Gilders Paste, Inca Gold Gilders Paste, 7mm jump ring, and the new Fairy Dancers Collage Sheet.
.....................................................................

This ornament was also too big for an Altoids tin however...
.....................................................................

It fit perfectly inside one of the new 3" Heart Paper Mache Boxes! The recipient is very crafty so I left the box plain so it could be altered later. I used the same shredded kraft packing, however I also added some pink tissue for a little pop of color.
.....................................................................

Tie it up and it's ready to go!
.....................................................................

This sweet steampunk cupcake gal was a blast to create. I used one of the new Paper Mache Cupcake Boxes, Mini Gears, White Mica Flakes, Real Red Metal Paint, and a Small China Doll Head. If there is interest I may create a tutorial for her?
.....................................................................


I must admit I got pretty hungry for cupcakes while making her!
.....................................................................

The recipient of this sweet gal LOVES candy, so I filled her with Hershey Kiss Hugs and Cherry Cordials! Last night I gave out some of my handmade gifts, which is definitely the best part! What handmade gifts are you giving this year?

Thursday, December 8, 2011

New Land of Enchantment Collage Sheets in the Shop!


I just listed 17 gorgeous NEW Land of Enchantment Collage Sheets in the shop! You can see them all right HERE. There are new ATC images, New Christmas Images, Tags, and so much more. Available in digital and printed formats!


The Owl Wishes sheets are definitely among my favorites! There are TO/FROM tags and greetings tags. You can buy BOTH digital sheets for a special price too!


Oh My Deer! These are so cute! Also available as TO/FROM tags! The gift tags are also pretty awesome on vellum.


Check out this beautiful Fairy Dancers Sheet! This one called to me right away, so I used it to create this sweet heart ornament that will be given as a gift.


To create this ornament, I used the Large Heart Ornament Parts (I layered a solid back, open frame with charm loop, and then an open frame), Heart Key Charm, Patina Gilders Paste, Inca Gold Gilders Paste, 7mm jump ring, and of course the new Fairy Dancers Collage Sheet.


I hope you enjoy the NEW sheets!
 And don't forget to enter our current giveaways. As always they are all linked up on the right side bar.

Tuesday, December 6, 2011

'I Love Retro Cafe Art Gallery' Blog Contest Winners!

Our latest contest has come to a close and all of the entries were so wonderful! A big THANK YOU to all who entered and followed along. You can see all of the fantastic entries HERE! And now for the winners...


The two $50 Retro Cafe Art Gallery Gift Certificates go to Diana Heyne & Greta Young!


The two Coffee Break Design goodie packs are going to Jennifer Willis & Virginia Smith!


And the 5 pack of Digital Collage Sheets are going to Eugenia Strange!


We also had a special guest judge pick from our friends at 100 Proof Press. Their team selected their favorite for a generously donated $30 100 Proof Press Gift Certificate. Thanks so much 100 Proof Press!


And the winner as selected by 100 Proof Press is this wonderful piece by Mary Jane Chadbourne! I'm a fan as well as the moon is wearing our Glasses Cut-Outs!

Congrats to all of the winners! Please email us at retrocafeart@gmail.com to claim your prizes!

There are two giveaways still going on HERE (ends Dec. 10th) and HERE (ends Dec. 17th). Simply comment on the posts to enter. We also have a giveaway on our Facebook page every Wednesday so be sure to like us!

Monday, December 5, 2011

Denise's Cake and TWO $25.00 Gift Certificate Giveaways!


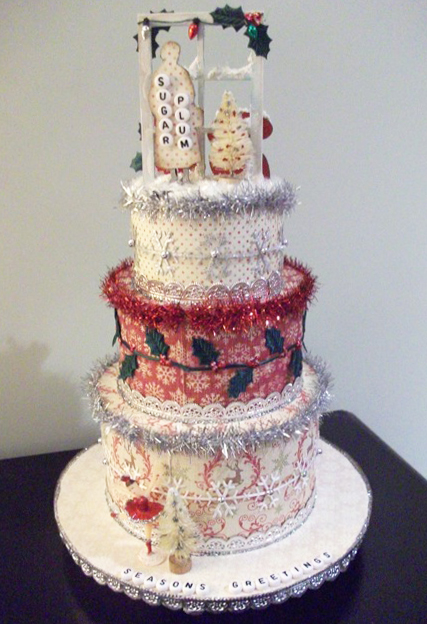
The fabulous Denise Phillips of Bird Nuts Mixed Media and I are at it again! She has created two fabulous projects for you to see, and we are BOTH having a giveaway on our blogs for a $25.00 Retro Cafe Art Gallery Gift Certificate! SO you have two chances to win! Before we get to the giveaways, let's check out Denise's awesome pieces!


Denise used several Retro Cafe Art Gallery products to make her amazing holiday cake including Paper Mache  Boxes, Incredi-tape and sheets (to attach her papers), German Dresden (Fancy Silver Scalloped), Ballerinas, Stand-Up Numbers, 6 Pane Window, Tinsel Garland, White Mica Flakes, Stand-Up Bus Stop Lady, Mini Christmas Light Garland, and White Alpha Beads. So yummy!


She used the Real Red Metal Paint to paint the ballerinas!


If you look under the cake you will see Denise used the lid from the largest box and a cut-out circle of cardboard to make the "cake plate". So clever!


And Denise didn't stop at the cake! She also made this adorable shrine using the ATC Shrine Kit, Stand-Up Bus Stop Lady, Filigree Box Feet, Ballerina, Medium Chiswick Frame and White Alpha Beads. I just love this so muh!


Thank you Denise for the wonderful inspiration and holiday cheer! We have some cheer for YOU too in the form of TWO giveaways!

GIVEAWAY Details:

1. To enter a chance for the gift certificate on this blog, simply leave a comment on this post!
2. Next, hop on over to Denise's blog, where she will also be giving away a Gift Certificate. Sign on as a follower of her blog and leave a comment. Then you are entered in BOTH giveaways with two chances to win!
3. Deadline to enter is Saturday December 17th . I will use a random number generator on December 18th to select the winner! Denise will do the same on her blog.
4. As you know I always like to sweeten the pot. If you are a winner on this blog and also a FACEBOOK fan I will make the Gift Certificate $40! Let me know in your comment.

There are also a few new goodies listed too!

Saturday, December 3, 2011

Mini Journal Necklace Tutorial


In this tutorial we will be making a Mini Journal Necklace as shown above. You can order the supplies separately on the site or you can order a Mini Journal Necklace Kit.
................................................

...............................................

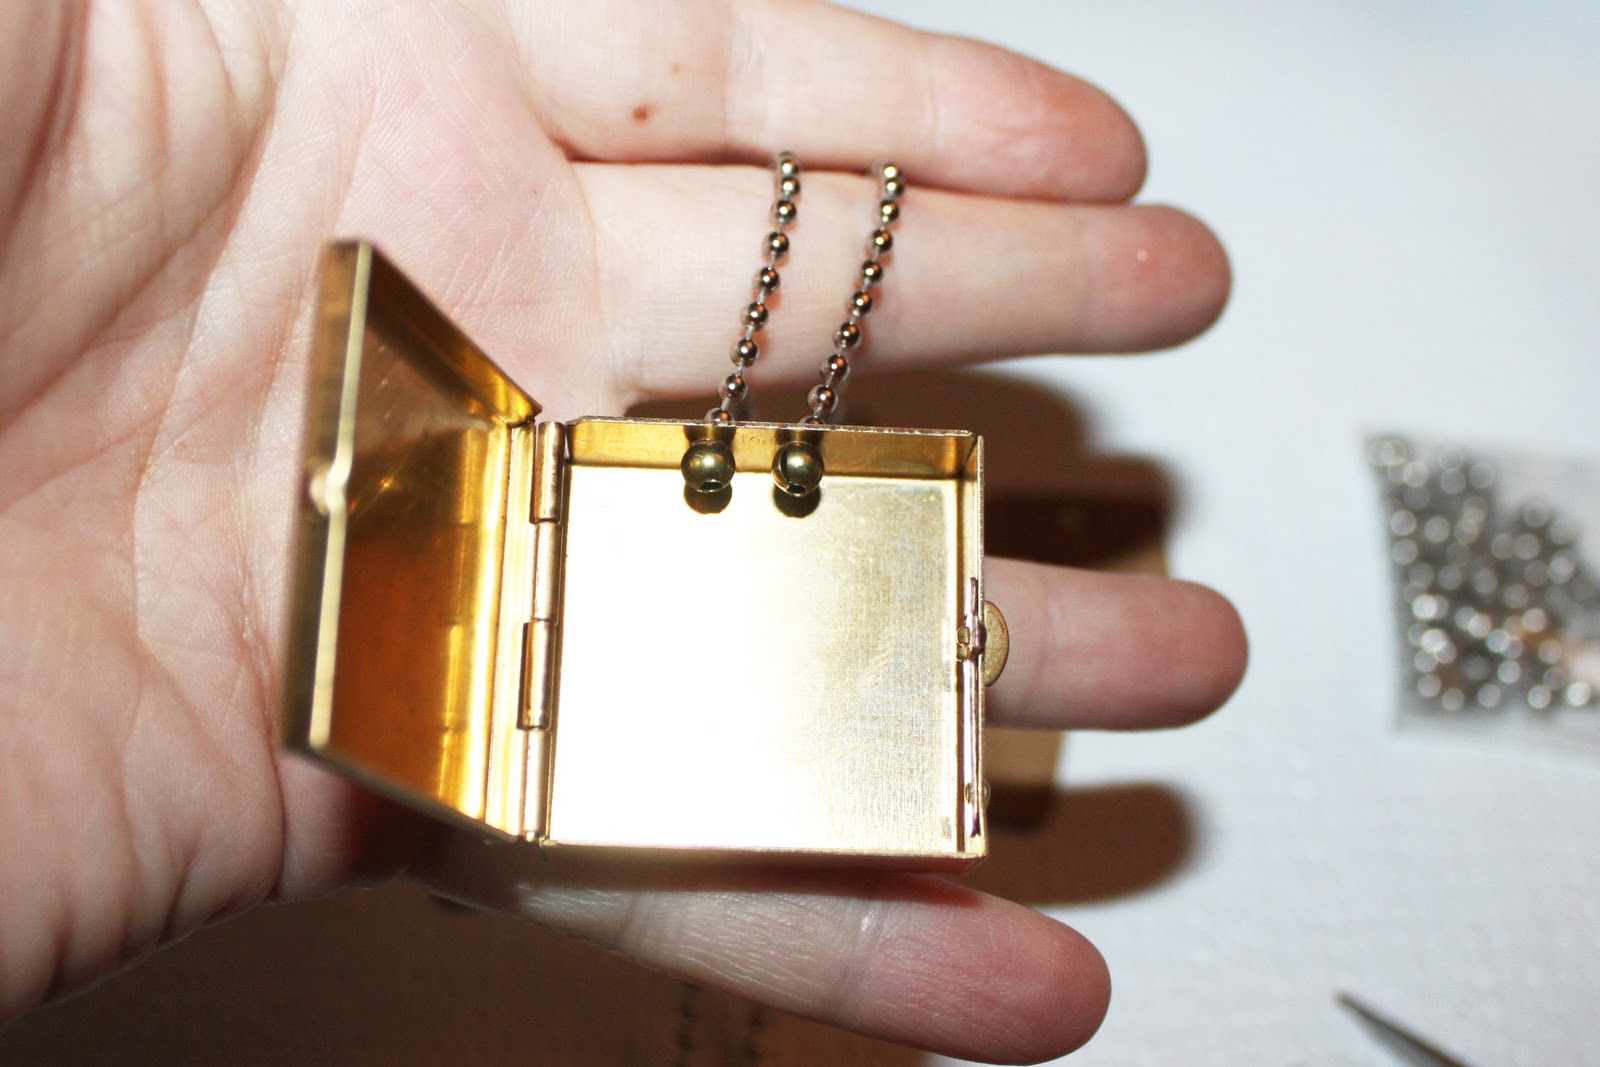
Begin by punching 2 holes in the top of the box using a metal hole punch. If you purchase the Kit, the holes will already be punched for you.
................................................

Remove the connector from your Ball Chain and thread one end of ball chain through the hole in the top of your box (go in from the top/outside) and add an Open Ball to the end. Position the open ball over the last ball on your chain and squeeze shut using jewelry pliers. Repeat for the other side. If you are leaving your necklace 30" long, no need to use the ball chain connector as it can fit over the head. If you want a shorter chain, simply cut to size and use the connector in the middle of the chain to secure.
................................................

The Open Balls will keep the chain in place.
................................................

Add an Open Ball to the chain on the outside of the box as well so your chain does not fall down inside your box. I used brass Open Balls on the inside and silver on the outside. The Kit comes with both finishes.
.................................................

Stack your 9 journal pages and then place a Long Brass Eyelet through the hole. Place your Brass Eyelet Washer smooth side up over the eyelet stem and then set your eyelet with a 1/8" Eyelet Setter . Remember to set your eyelet on a hard surface. I use a steel block. Don't pound too hard as you want your pages to move freely. You don't want a super tight setting. Alternatively, you can simply attach your pages using a 7mm Jump Ring.
.................................................

The pages can now rotate open (or flip up if you use a jump ring).
.................................................

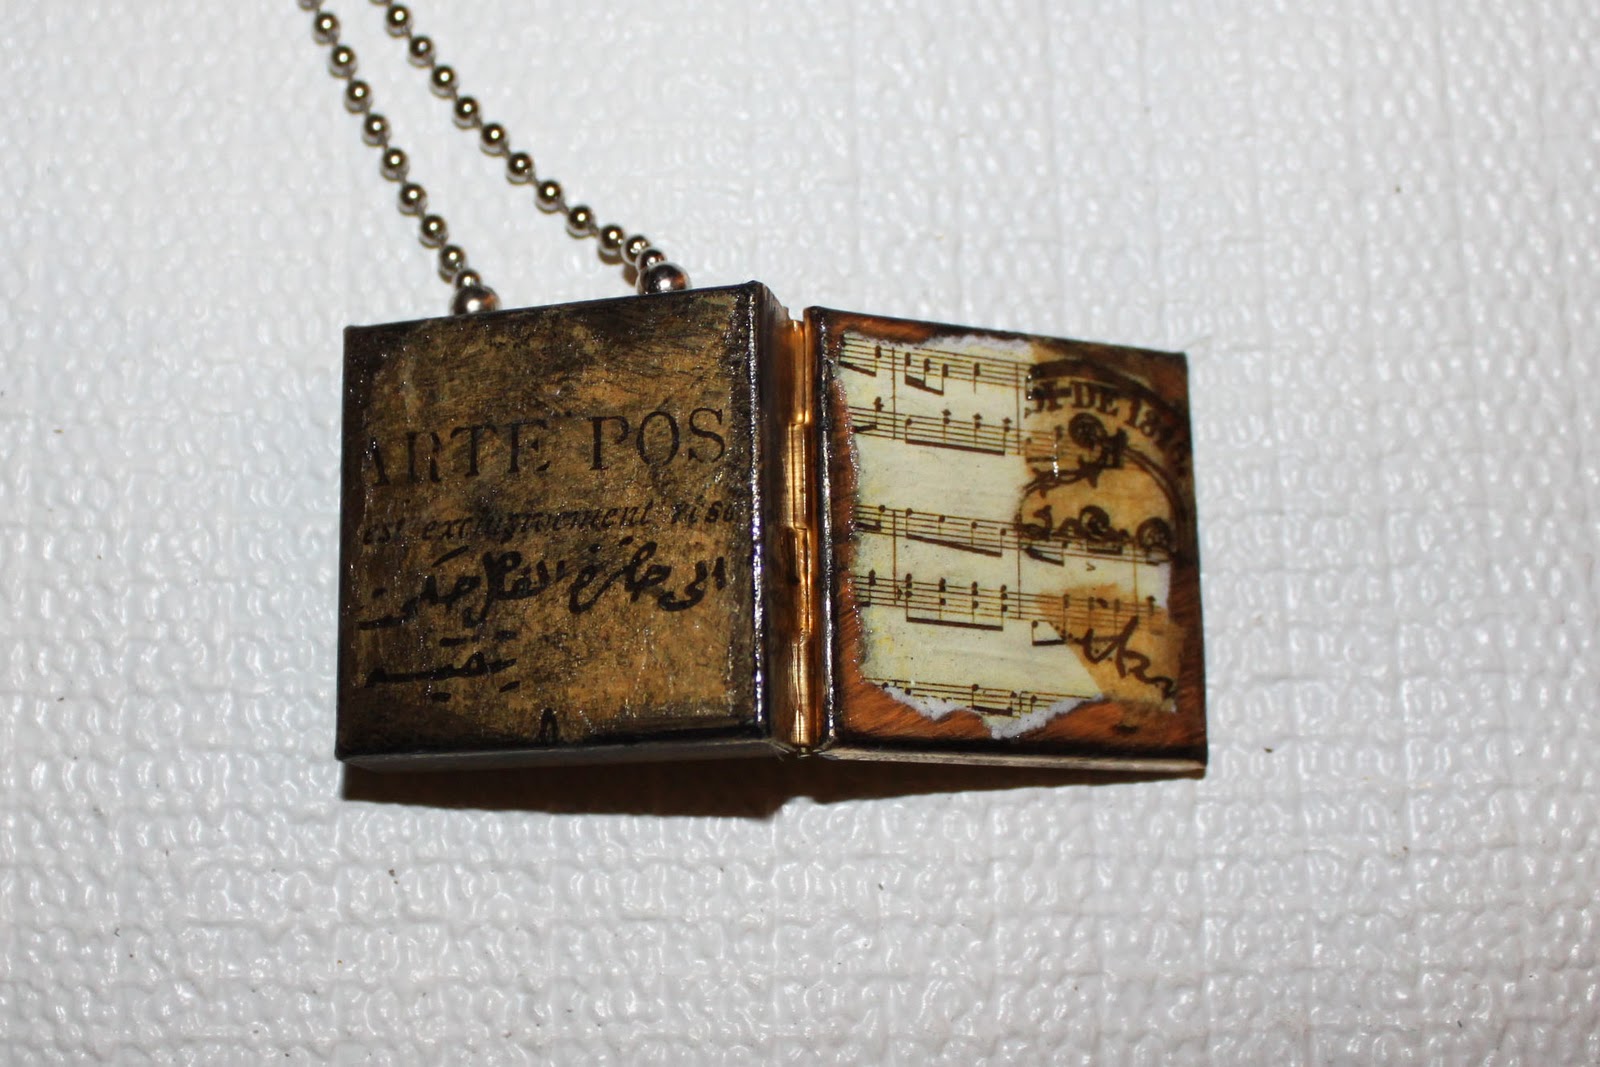
Next, using my finger I added some patina with Black Gilders Paste. I tore some images from the laser printed DP113 Collage Sheet and attached them using Diamond Glaze again using my finger. Add a thin layer of Diamond Glaze on the top of your image to seal as well. I think tearing the images makes them look more aged. Add more Black Gilders Paste as desired.
.................................................

On the back I added more Black Gilders Paste and attached some printed tissue (any Tissue Tape works great) using more Diamond Glaze (top and bottom). The Diamond Glaze makes the tape translucent so only the print shows.
.................................................

Here you can see the front and back.
.................................................

I wanted a more aged look so using my finger I added Patina Gilders Paste with a focus on the edges and a bit of Inca Gold Gilders Paste for some shimmer. Add a final thin layer of Diamond Glaze using your finger to seal.
.................................................

Finally using E6000 I attached a few embellishments. A Resin Octopus aged with Inca Gold Gilders Paste on one necklace. And on the other a plain Masonite Mini Gear and a Masonite Letter (.75" S) aged with Patina and Black Gilders Paste. I also did a light spray of Krylon Satin Acrylic Sealer on both necklaces front and back for added protection.
.................................................

The backs.
.................................................

Pop your mini journal and Mini Pencil inside your box and done!
I hope you enjoyed this tutorial and if you are interested I've put together a Mini Journal Necklace Kit. These make excellent gifts!

Sunday, November 27, 2011

82 Fabulous New Goodies + Project Inspiration

 
I'm so excited about the AWESOME new products we have for you! All 82 of them (plus the new Collage Sheets for a total of 102!). I just couldn't stop myself this time around for our largest release yet! The first thing I'm really loving is our new BASICS collection. TONS of blanks - ATCs, Microslides, Dominos, Circles, Squares, Letters, and so much more in just about ever size, style, and material you can think of! Many people have asked for certain shapes with different holes etc. so now everyone is set! Check it all out HERE.


Here are a few more of my favorites! I know Christmas isn't even here yet, but I was excited to start working on my second favorite holiday (aside from Halloween) Valentine's Day! I threw in some St. Patrick's while I was at it. Above, Heart Skeleton Keys!


Circus Muscle Man Stand-ups (several styles).


Beautiful Cameo Frames and Profiles!
Also sized to fit our Crystal Clear Acrylic Cabochons.


"Candy" Hearts - in Classic, Current, and my favorite Anti-Valentine :). 


Yummy!


Vintage ruler charms!


 And 14 new Valentine and St. Patrick's Day stencils!


There are WAY too many new goodies to list, but you can see them all HERE!


With Christmas around the corner it was time to start working on some handmade gifts! I put several of the new products to the test and I can tell you they are fabulous! I plan to create tutorials on each piece below in the future, so I won't go into too much detail, but I will tell you which products I used.


Mini Journal Necklaces
Supplies:


I used the 1" Rounded Square Stencil Board blanks to create the mini journal. The pages rotate open :). Complete with mini pencil.


Junk House
Supplies:
House Shrine PendantKey Charm, Gilders Paste (Black, Patina, Inca Gold), and Silver Pin Back


Bird Bracelet
Supplies:


Earring Tree (hehe)
Supplies:


Day of the Dead Brooch
Supplies: 


I had a blast making these! I also found that because I was making them with a specific person in mind, the ideas were flowing like crazy!