Wednesday, July 18, 2012

New Jersey Bound!


Hi everyone, just stopping by to tell you about a couple things. First off, Our friend, the talented Debrina Pratt from Land of Enchantment, is offering a fabulous online Fairy Cake Workshop! AND she is offering a SPECIAL SURPRISE for Retro Cafe Art Gallery fans! When you register for her workshop, type in "RetroCafeArt" at check out to receive a fabulous special bag of surprise goodies with your workshop kit. You MUST enter "RetroCafeArt" at the workshop check out to receive the EXTRA goodies! You can register for her fabulous workshop here.


We are getting ready to hit the road to vend with our fabulous Coffee Break Design goodies at CREATE in New Jersey and visit with some family on the East Coast. The vendor's fair on Friday night is free and open to the public. I would love to see some of you!


A few weeks ago we had a fabulous Halloween release and to keep you in the mood I thought I would share this spooky shrine by Design Team member Jennifer Ingle. Jennifer used the Large Exquisite Shrine as her base and also used a Cross Cut-Out, Bat Cut-Out, Fleur de Lis Cut-Out, and the Happy Hallow 3 Collage Sheet. All of her pieces are embossed. I just love the finish. And how cute is her "string of garlic". I'm really looking forward to our Gothic Tombstone ATC swap. You still have plenty of time to enter!


Time to hit the road! And for those of you in the Midwest, we will also be at Stampaway in a few weeks. Busy busy!


Sunday, July 1, 2012

New Halloween Goodies, Tombstone ATC Samples, + an ART SWAP!


Hi everyone! I don't even know where to start! Oh my Halloween! We have TONS of NEW Halloween goodies and I'm so excited about them. I loooovee Halloween and couldn't wait to get an early start! You can check out all the new goodies HERE and I'll show you just a few of my favorites. Obviously, the New Haunted Door Shrine Kit is #1!


These totally adorable Potion Bottles even come with a Mini Sticker Label sheet sized to fit! Available with our without charm holes!


I'm pretty much obsessed with anything that relates to skeletons, so for me these Rib Cages are to die for. (pun intended. ha!)


And if you like our Glasses and Mustaches you will LOVE these Masquerade Masks! You collage guys and gals will be ready for the Halloween Ball! I think I love these most!


And what is a witch without a wand! These cute Spider and Star Witch Wands were inspired by my favorite new Halloween stencils below. I was looking at them and thought, if I just turned them around... poof! Wands!


We have 17 brand new Halloween Stencils and these spiders pull at my heart strings!


And some Falling Stars? Yes please! The spiders and stars can also be flipped around to have them coming up from the bottom of your pages too!


And again, skeleton obsession! After making the cut outs I knew I had to have stencils too!


Does anything say Halloween more than a dripping blood border? What's great about this stencil is that you can also use it year round. Color the border hot pink, green, blue, etc. and you now have dripping paint! And the drips and splatters can be added where you please.


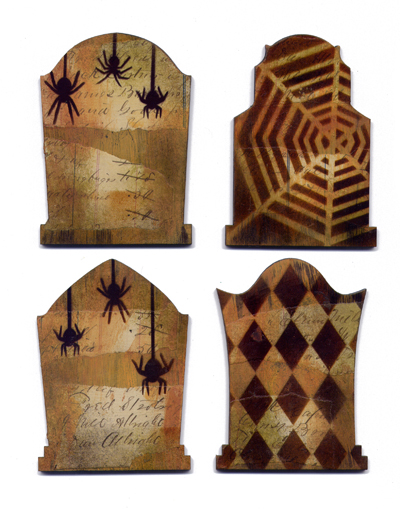
Time to play! Come see what I made... I started with our Masonite Gothic Tombstone ATC Bases and some Antique Ledger Paper.


Using a sponge brush, I quickly swiped some orange acrylic paint across.


Then I tore off some strips of ledger paper and attached them with Mod Podge and my sponge brush.


After adding a bit more paint over the paper (I added some copper paint too), I stenciled away using our new stencils: Small Diamond Background, Small Spider Border, and Spider Web and Corners. I just love the way the backgrounds turned out! Especially the web (which was my least favorite when I was designing them. Funny how that works!).


All of the images came from the Edgar Allen Poe Collage Sheet and Beautiful Marie Collage Sheet. Finally, I embellished using our new Cut-Outs including Masquerade Masks, Extra Small Bat Wings, Gothic Fences, Witch Wands, Rib Cages, Skulls and Crossbones, and Potion Bottles. Lastly I added bits of paint here and there and inked the edges. So easy and FUN!

I hope these ATCs inspired you because we are hosting a Tombstone ATC ART SWAP. You can get the details HERE!

And don't forget to check out our main Halloween category + our Coffee Break Design Cut-Outs Halloween category. We had some great releases last year that are still awesome to play with! I can't wait to see what you come up with. Happy Halloween!!!

Wednesday, June 27, 2012

Free Patriotic Images!


I have another gift for you as we continue to celebrate this week on Facebook! With my favorite summer holiday just around the corner, I thought you might enjoy some Patriotic images. These are my two favorites from our 4th of July Collage Sheet. You can right click and save them to your computer. For personal use of course and as always, you are welcome to share.

And don't forget to go get your free Parisian Beauties Collage Sheet!

Tuesday, June 19, 2012

Paper Cuts Giveaway on Facebook and a cute tin Make-over!


Did you know that we have a giveaway every Wednesday on Facebook? While I don't usually post them here, this one was just too cute not to!
This week you can win a big set of our Brand New Paper Cuts! Go to the post HERE on Facebook that has this photo, click the photo, and leave a comment. That's it! The winner will be announced on Thursday.

I wanted a cute container for shipping, however didn't have a lot of time so I pulled from my large stash of Altoids tins, covered it with some torn off pieces of Washi Tape, tied with some pink Baker's Twine, and voila! Cute as can be. And it literally took seconds with unlimited color combination possibilities. I LOVE Washi Tape!

Friday, June 15, 2012

Ornate Theatre Shrine Kit Samples from the Design Team + More!


A few weeks ago I release our fabulous new Ornate Theatre Shrine Kit! The Design Team went to work right away to create some awesome samples! First up is Jennifer Ingle with her gorgeous "Alice Summers in Paris" Theatre Shrine.


Jennifer also used an Arc de Triomphe and Eiffel Tower Cut Out in her piece. And of course the Red Theatre Curtain Collage Sheet.


Inside you will see cool bits from the Steampunk Parts Collage Sheet.


She finished her piece with a Corked Glass Vial filled with Glitter. Very Alice! Beautiful Theatre Jennifer!


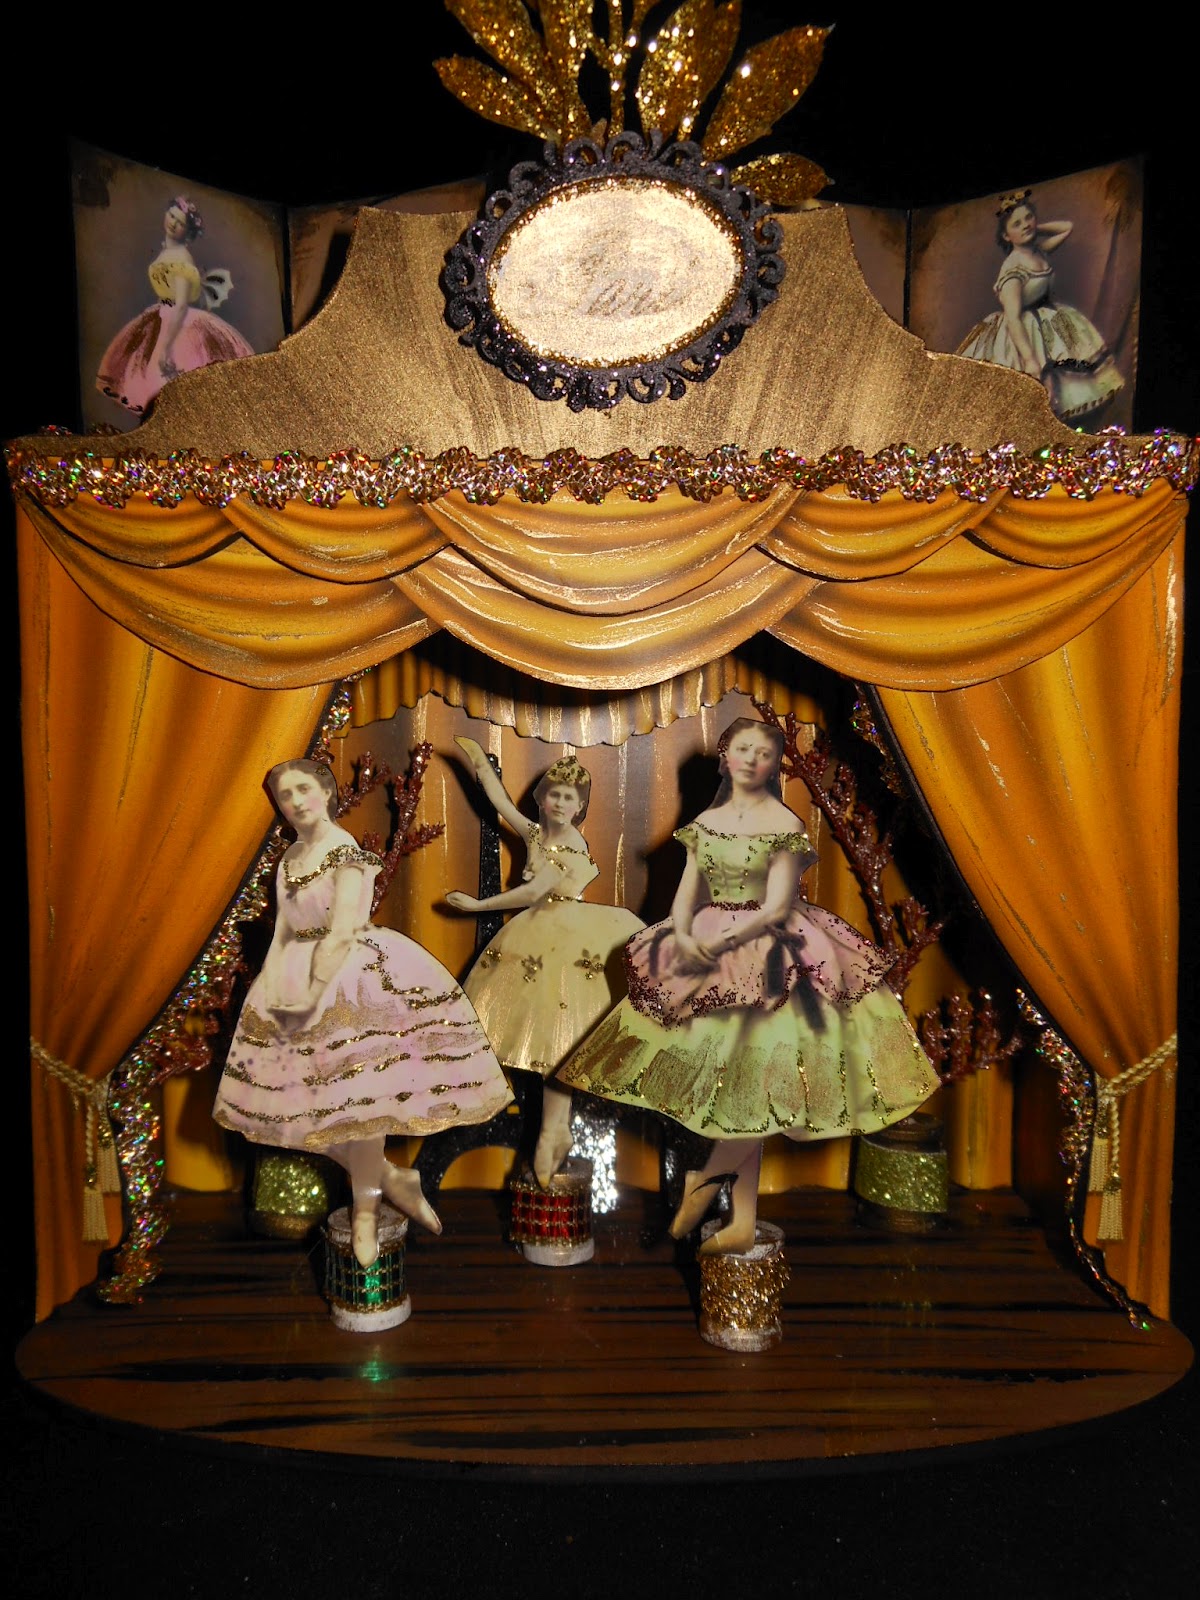
Next up, we have a stunning Theatre By Gerri Herbst. As you can see Gerri used the Gold Theatre Curtain Sheet. I just love her floor too. She used black acrylic paint to create the faux wood look.


The lovely dancers are from Collage Sheet DP247. "The dancers are movable so that the ballet can change each day"!


Gerri also glittered up a Large Eiffel Tower and Arc de Triomphe. Such an amazing piece Gerri!


I hope you are inspired to make your own Theatre Shrine. I still need to work on mine. I did add some lighting with a battery powered votive!


Also, there are some fun NEW goodies in the shop including 30 new Washi Tape designs. Isn't the Circus Dots tape super FUN! You can now find over 100 different Washi Tape designs in the shop! Love it!


And finally, the Paper-Cuts ATC winner from last week is #16, Sandra! Please email us at retrocafeart@gmail.com to claim your prize! Congrats!

Monday, June 11, 2012

A Special Offer for You From Land Of Enchantment!


*Read Below for a Special Offer!*

Our friend, the talented Debrina Pratt from Land of Enchantment, is offering a fabulous online workshop for the FIRST TIME! Finally, you can learn how she makes her exquisite art! As you know, we sell Debrina's fabulous Collage Sheets in the shop, so she is offering a SPECIAL SURPRISE for Retro Cafe Art Gallery fans! When you register for her workshop, type in "RetroCafeArt" at check out to receive a special bag of surprise goodies with your workshop kit. "The goodies will be printed ephemera, charms, ribbon, and shiny stuff"! You MUST enter "RetroCafeArt" at the workshop check out to receive the EXTRA goodies! You can register for her fabulous workshop HERE.

Thursday, June 7, 2012

Brand New Paper Cuts and More in the Shop + an ATC Giveaway!


 I'm so excited to announce some BRAND NEW PAPER CUTS in the shop! I think you are going to love these! As many of you know, I had been carrying Paper Cuts by the talented Scott Lyon for several years. Unfortunately, he's no longer selling the Paper Cuts, instead he is focusing on his fabulous Wood Cuts, which he's been selling for quite some time in his Etsy shop. I asked Scott if he would mind me making some Paper Cut sets of my own since I could no longer buy his, and he told me to go for it since I was already carrying them! So I did!

  
Here is a sample of Scott’s Wood Cuts available in his Etsy shop. Several of his Paper Cuts are also still available here, while supplies last.

And now onto the awesome new Paper Cuts! As a licensed Occupational Therapist, I can really appreciate the ergonomic usefulness of these. So many folks have trouble cutting due to arthritis, so I just had to keep these in the shop!


(These have to be my favorite! I can never cut a perfectly symmetrical egg!)


And last but not least, Dollies!

No doubt there will be many more sets to come!

In addition the the awesome Paper Cuts, there are other new goodies in the shop including 20 NEW German Dresden Designs, fab Vintage Goodies (including this cool ledger paper from the 1800s), and Alcohol Inks and Supplies (which are perfect with our Acrylic Charms!). Check it all out HERE.

*And now for some play time!*
(please excuse the messy work space. I hadn't planned on you coming over for a visit, however I decided to show you a few things!)


I knew I wanted to make a few ATCs! So I started with a piece of fabulous 1800s Handwritten Ledger Paper and my favorite Black Mat Board ATC blanks. I was elated to find that SIX ATCs fit perfectly on one sheet! It was serendipitous indeed! I simply covered one side of my blanks with Mod Podge and laid them on the paper. I just had to show you!


Cut or tear them apart and you are all set! Make sure to save those lovely little spare pieces for another project.


Since I had been making jewelry all day for an art show I have tomorrow, I wanted to get MESSY! So using some acrylic paint (white, aqua, and pink), a paint brush, and some Coffee Break Design Stencils, I went to town. The stencils I used were Small Heart Background, Large Onomotoholes, and the Psychedelic Circle Set.


While they were cute after the stenciling, I wanted to grunge them up a bit. This was actually my first time really getting in there and inking up the edges. Normally I just do a tad using my finger. But it was SO easy. I simply used one of the Tim Holtz ink blending pads and some brown and black archival inks. I didn't even use a tool, I just held the pad in my hand. I actually found that it gave me much more control! I was able to adjust the pressure as needed. And it must be something about that 130 year old paper - the ink just spread so nice and smooth. It almost looks like I knew what I was doing! Thanks awesome paper!


I kind of adore how the white stenciled hearts looked after the ink. They almost look like they have been bleached or burned in. Another unexpected surprise! And just look at that YUMMY Ledger Paper. This set is really something as it's completely covered in writing!


Finally, I embellished with the amazing new Paper Cuts! I used 6 of the 7 sets. Birds, Owls, Eggs, Butterflies, Moths, and Fish! I also played with some of the Alcohol Inks on the German Dresden. I used "Bottle" and "Denim" from the Rustic Lodge Kit to colorize a few pieces. The Silver Gate (bottom left) and Gold Cameo Frame (top middle) were easily transformed! For the butterfly ATC in the center I also used a Classic Brass Crown covered with a bit of Patina Gilders Paste.
(click the image for a closer look!)


Here is the messy proof that I colored the Dresden with Alcohol Ink. For some reason this mess looks beautiful to me. If you click on the photo, you will see there is a perfect little "you" in the center of the mess (completely by accident). Maybe you will get a bit messy this week too! I highly recommend it!

......................................................................

*** So would any of you like to win one of my ATCs from above?***
Leave a comment on this post letting me know which of the NEW Paper Cut sets you like best. Sometime next week I'll pick a winner (using a random number generator) to receive one of my original ATCs from this post! xo

Wednesday, May 23, 2012

Washi Tape Eiffel Tower ATC Holder Tutorial


I couldn't wait to play with our new Paris inspired goodies and thought I would share what I came up with! These super cute ATC holders and Paris inspired ATCs!
..........................................................................

To make the ATC holders, I started with the large Eiffel Tower Stand-Ups.
..........................................................................

First, I sprayed the front and back of both pieces with white spray paint. I knew I wanted to cover the whole thing with Washi Tape, which shows up best over a white background. Spray paint works great on the Masonite pieces and is super fast!
..........................................................................

Next, I covered the tower using vertical strips of Washi Tape. Any color would work, however I thought the Black with White Dots would be super cute!
..........................................................................

I quickly covered the piece, just tearing off the tape with my fingers (I love that it tears so easily!). Make sure to cover the entire piece.
..........................................................................

Using some small scissors (or an xacto knife), cut around the tower.
..........................................................................

Use sand paper to file down any spots that you missed.
..........................................................................

The small open areas would have been difficult to cut around, so I cut out the whole area, and filled in the white areas with black acrylic paint.
..........................................................................

Once the paint was dry and the piece was sealed it blended right in!
..........................................................................

Cover your base in the same manner. You can push in the open areas using the tip of your finger and then cut them away using an xacto knife.
..........................................................................

You can cover both sides using Washi Tape if you would like, just repeat the steps above. Instead, I decided to stamp the other side. Simply stamp with a permanent ink. I used Ranger Archival Ink.
..........................................................................

I sealed the taped side using Mod Podge and a sponge brush.
..........................................................................

To finish the piece pop the tower into the base using a little bit of glue to secure. I also added a sweet Pink Baker's Twine bow!
..........................................................................

I love the back just as much!
..........................................................................

For the second tower I used a 2 step spray crackle. I love spray crackle as it always seems to come out just right and it's extremely easy to use! Simply follow the instructions on the can. And of course spray the tower and base separately, and attach once dry.
..........................................................................

And voila! Attach your favorite ATCs using clothes pins!
..........................................................................

One tower can hold up to 3 ATCs (though I only have 2 pictured). Cute!
..........................................................................

To make my clothes pins extra cute, I inked up my stamp and then pushed them down onto the stamp. This made it easier to see how I was lining up! You could also color the pins further with Distress Markers, Copic Markers, acrylic paint, and more.
..........................................................................

And of course I had to make some ATCs for my holder!
 ..........................................................................

For the bases, I used my favorite Black Mat Board ATC Bases. They are the perfect thickness and weight, plus I like having the nice black back.
 ..........................................................................

For my first ATC I started by attaching an image from Collage Sheet DP253 using some Incredi-sheet. I added some white acrylic paint and then aged the edges using brown ink and a Color Duster. Next, I attached a few strips of Washi Tape (Black and White Dots and Red with White Hearts). The burst was created using one of the stencils from the Small Psychedelic ATC Set and embossing powder. I placed my stencil and then inked it up using a Color Duster. Then I poured on some embossing powder, tapped off the excess, and finally heated. I love the way it turned out! Finally I added some Inca Gold Gilders Paste using my finger to one of our Masonite Eiffel Tower Cut-Outs and attached using Mod Podge. Look how perfectly the middle heart shows through the tower! And totally by accident!
 ..........................................................................

For this ATC, I attached strips that I tore off from Collage Sheet DP253 and Collage Sheet DP113 and added a bit of acrylic paint using my finger and black ink around the edges. I embossed the Small Paris Skyline Stencil on the bottom, and then added a touch of German Dresden. The bottom is a piece cut from the Gold Baroque Border and the frame is from the Gold Cameo Frame Set. Finally I attached a Masonite Fleur-de-lis Cut-Out. I thought it looked great without any color, so I left it natural.
..........................................................................

For this final ATC, I started by attaching a vintage book page using Incredi-sheet. I added a generous amount of acrylic paint, and a beautiful Marie images from Collage Sheet DP196. On the bottom I added a bit of Gold Baroque Border German Dresden. And finally I added Inca Gold Gilders Paste to one of the small Eiffel Towers in the Eiffel Tower Mix Cut-Out Set. The tiny ones are SO cute! I just love them!
 ..........................................................................

I love the backs of the Black Mat Board ATC Bases! Ideally I would have loved to sign them with a white or silver gel pen, but I didn't have one so I settled for a yellow colored pencil.
 ..........................................................................

I hope you enjoyed this tutorial! The Eiffel Tower Stand-Up ATC holders would make a great gift! And of course they can hold photos as well!
..........................................................................

On a side note, remember this fabulous Ornate Theatre Shrine? How about lighting it? I purchased a battery powered votive candle, and attached it to the ceiling using velcro. The Red Curtain hides it perfectly!
..........................................................................

Lights, camera, action! Now I just need to fill my theatre with a fabulous scene! xoxo