Friday, June 28, 2013


Happy almost weekend everyone! We have several new goodies in the shop! THREE MORE awesome Fairy Shrine Kits (not for the swap, but just for FUN), Articulated Doll Shrine Kits in two new smaller sizes, STUNNING Stand-Up Flowers (my favorite), and more!
Hopefully some art samples will follow soon. I'm "dying" to try the Dia De Los Muertos Fairy! See it all HERE.
 
 
Last week we announced our NEW Fairy Shrine Kit Art Swap! Come play and make some magic will us! Details are HERE.

Friday, June 21, 2013

Inspiration Fairy Shrine ART SWAP!

 
Guess what? It's time for a new ART SWAP at Retro Café Art Gallery!
If you thought the Mini Houses were fun, just wait until you start playing with these Inspiration Fairy Shrine Kits! You can get the full details HERE.
 

And of course there are several coordinating goodies, many of which are on SALE in honor of the SWAP! You can find them all HERE.
 
What kind of Fairy will you make?
 
Here are a few ideas: Explorer, Artist, Garden/Flower Fairy, Circus/Animals, Steampunk, Chef/Cook, Paris, Celestial, Halloween/Gothic, Frida/Day of the Dead, Beach/Summer, Marie Antoinette, Vintage/Junk Queen, Antique Doll, Collector, Dancer, and I'm sure you can come up with lots more!
xoxo

Sunday, June 16, 2013

Happy Father's Day - a GIFT for YOU!

 
Happy Father's Day from Retro Café Art Gallery! As a GIFT to YOU, our wonderful customers, please enjoy this Free Digital Collage Sheet containing "A Few Good Men" from our personal collection!
 
 Download it FREE on our site HERE.
xoxo

Saturday, June 15, 2013

Retro Has Gone Retro!

 
Come see the groovy new goods in the shop this week. Nine BRAND NEW Retro Collage Sheets, FUN Vintage Goodies, and the Prima Vintage Mechanicals Collection. You can find it all HERE. And hurry, several of the Vintage Goodies are in limited supply!

 
And for even more nostalgia, check out Design Team Member Linda Cain's hand using the Hand Trinket Shrine Kit! You can find more photos and instructions on Linda's Blog!
 
(pssstttt... all Washi Tape is on sale through the weekend at our lowest prices yet! We need to make room for new inventory and many of the designs will not be ordered again. Get it HERE while you can!)
 
Anyone else feel like putting on a Poodle Skirt?
Have a great weekend! xoxo

Saturday, June 8, 2013

New Goodies!

 
Happy Saturday everyone! Come see what's new in the shop! Three new Shrine Kits (including a house with a balcony - squeee!), Glitz, and Bezels galore! I've always wanted to own a house with a balcony. Until then, this will have to do! You can catch it all HERE.
Wishing you some art time this weekend! xoxo

Tuesday, June 4, 2013

Antique Mirror Relic Clear Acrylic Shelf Shrine Kit Tutorial

 
Hi everyone! I'm going to walk you through how to make the gorgeous shrine above using our new Clear Acrylic Arch Shelf Shrine. Of course you could also use the Pointed or Rounded Shrine. I'm calling this my Antique Mirror Relic Shrine because that's exactly what it ends up looking like!
(Note: All of the supplies used are linked at the bottom.)

 
I started with a piece of scrapbooking paper for my background and gathered my Collage Sheets. I'm using Full of Grace, Collage Words, and Collage Borders. Of course you can use what you would like. And have your Acrylic Shrine ready.

 
Roughly trace around the shrine. This will be the area you collage. I found it easier to cut out my pieces after I finished the collage. This way I could be more messy!


Using Mod Podge I attached images from all three collage sheets above. I added a bit of stamping and doodling. Of course you could stop here and simply cut out your pieces and attach them to your shrine. But I wanted a more aged, antique look.

 
Remove the protective paper from both sides of your shrine pieces. Once you have a corner started, it easily peels right off and the pieces are ready to go. No prep needed.

 
Next I added some of the new Viva Mirror Paint around the edges. At this point you will be working on the back of the pieces so everything shows through the front. I added the paint using a sponge. What happened next was very unexpected, but I loved the result. Because I got some paint on the edges, some cracks started to form. This really gave the pieces an authentic cracked mirror look! Using my fingernail, I also scraped off some of the paint to further the aged look. Don't use anything too sharp or rough as it might scratch the acrylic. Unless you want that look! A finger nail was perfect.

 
The mirror paint really does reflect and looks like real mirror, though it's difficult to photograph. The "red" areas in this photo show the light reflecting off the "mirrored" areas.

 
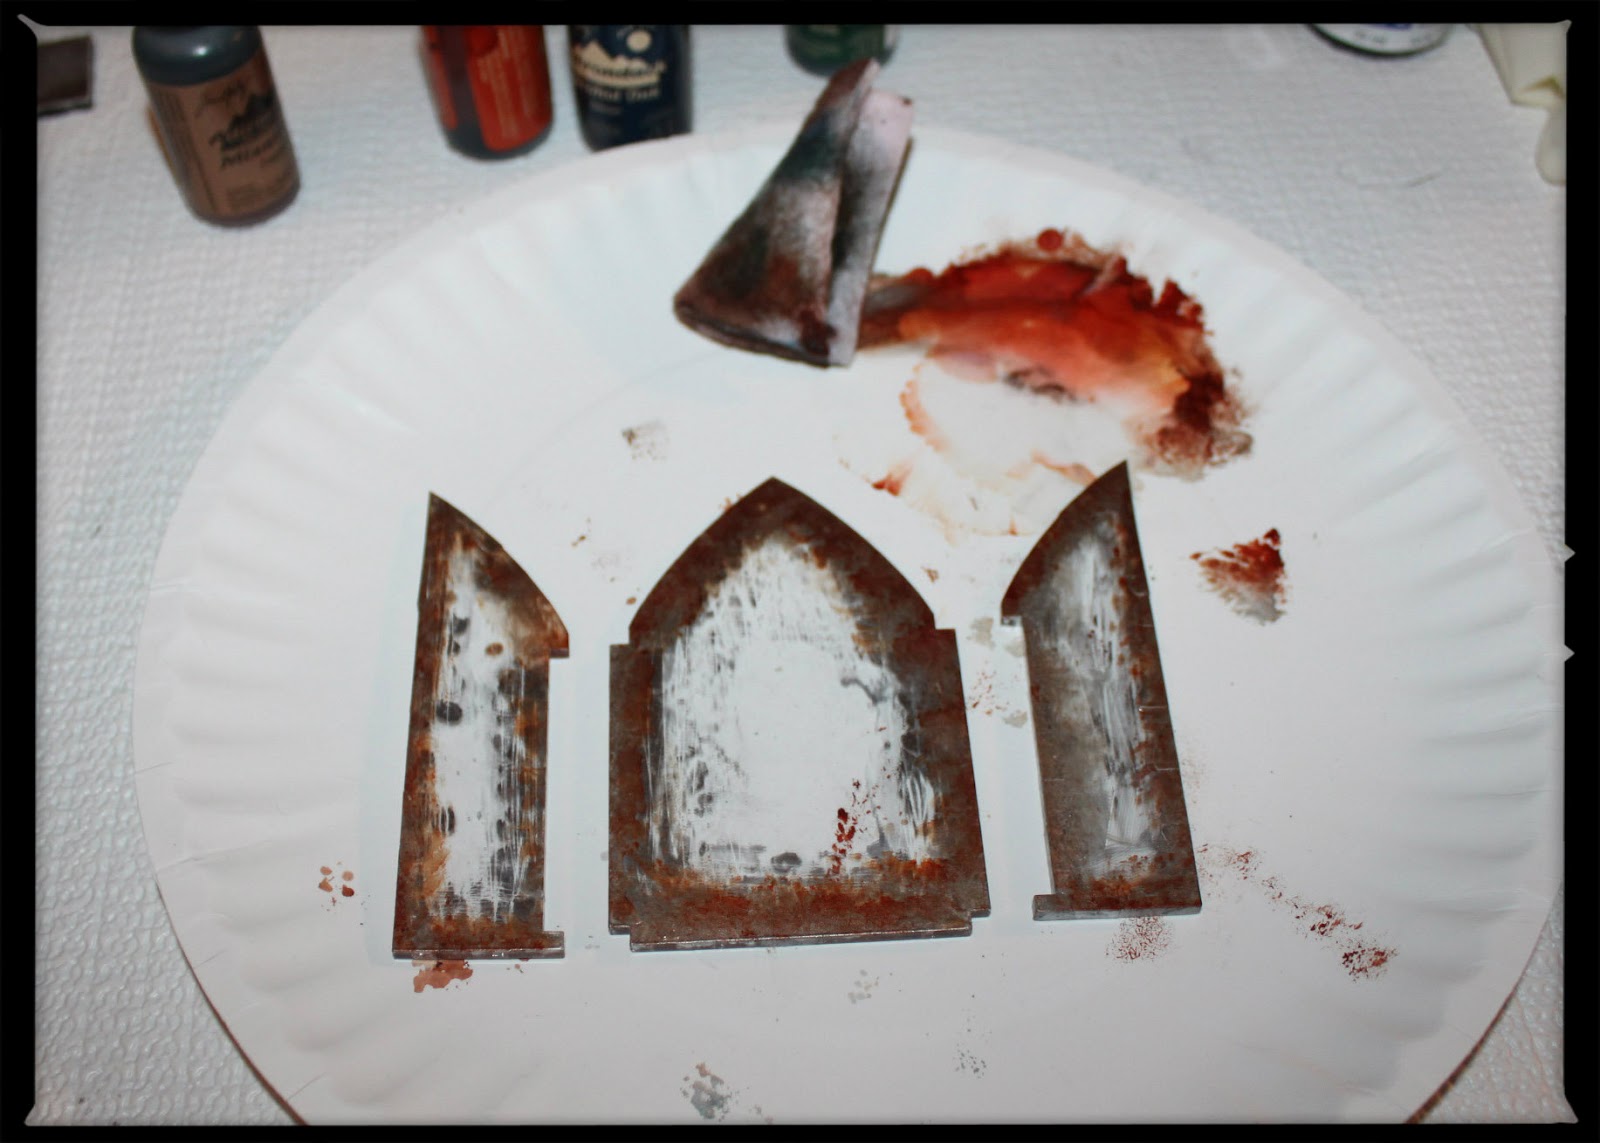
Working from the back again, I also added some alcohol inks to the pieces. You can use any colors you choose. I wanted to mimic a rusty look, so I used Terra Cotta mixed with some Copper and Pearl Mixative

 
Using your shrine pieces again as a template, cut out your collage. First trace the entire thing like you did earlier and cut it out in one piece. Then use each side piece as a template to cut out the sides. Trace first, then cut.

 
Cut out a piece of Incredi-sheet that is larger than the collage piece. Peel off the adhesive backing from one side of the Incredi-sheet and then lay your collage piece on top (face down) pressing firmly.

 
Cut off the excess Incredi-sheet. You basically now have a sticker. Remove the second layer of adhesive backing from the Incredi-sheet and press your collage image face down on the back of your acrylic piece, right on top of your mirror paint etc. Take care to line it up before pressing down since the strong tape is not repositionable. If needed, trim around your acrylic piece with scissors or an xacto knife.

 
Burnish with a bone folder and repeat for the shrine side panels. If you don't want to use double sided adhesive, you could also secure the pieces to the acrylic using Diamond Glaze, Glossy Accents, or any clear drying adhesive meant for clear substrates. I love the Incredi-sheets because they are super permanent and not at all messy!

 
If you are like me, you may want the back to look pretty too. I spray painted mine with silver spray paint and then stamped an image.

 
 Finally, attach the sides with a bit of glue at the desired angle. I used a dab of E6000 at each end and just to be sure it was nice and secure, I also ran a line of Diamond Glaze along the seam in the back.

 
And there you have it!

 
Again, the mirror doesn't photograph perfectly, but you can really see the reflection in the above photo. It's bouncing nicely off the "ground".

 
The acrylic is extremely fun to play with and allows you to use several cool techniques. Keep in mind you can also just attach your collage to the front and back like you would a piece of Chipboard or Masonite if you prefer that look! The sky's the limit!
 

Saturday, June 1, 2013

New in the Shop, A Giveaway, and Eye Candy!

 
Happy Weekend Everyone! We have lots of NEW goodies in the shop this week! Of course the New Vigil Light Kits and Clear Acrylic Shelf Shrines are my favorite! You can see it all HERE.

 
The Vigil Light Kits are wonderful and definitely a must have for any shrine enthusiast. As I was photographing them, a HUGE light bulb turned on in my head! What if...

 
YES! If you reverse the top and bottom pieces you now have awesome display bases! So you have two design options for these kits! This even works with the Triple Triple Kit. You can use them as bases with SO many of our Shrine Kits. I LOVE happy accidents!

 
I couldn't wait for some art time! I made this using our new Acrylic Arch Shelf Shrine. I'll do a tutorial for you later this week. In the meantime here are the supplies I used:
Arch Clear Acrylic Shelf Shrine, Full of Grace Collage Sheet, Borders Collage Sheet, Collage Words Collage Sheet, Viva Decor Mirror Paint, Alcohol Inks, and Incredi-sheet
 
................................................................
 
I think we are also due for some wonderful Design Team Eye Candy!

 
Lynn Stevens created this gorgeous garden inspired Star Shrine. As Lynn stated "This time of year some gardens are the STAR of the show." Wonderful Lynn!

 
This happy, bright Hand Shrine Kit is by Amy Nieman. Amy also used Collage Sheet DP233, Large Flourish Stencil, and Number Remnant Rubs to create this wonderful piece. Perfect Amy!

 
This amazingly sweet necklace is by Gerri Herbst using the House Cut Outs with Charm Holes. I would say Mary Lou has never looked so good!! Adorable Gerri!

 
And last but not least, Linda Cain created this fabulous Steampunk Man using the Large Manikin Doll along with several other RCAG goodies! He is so amazing AND you have a chance to win a $25.00 Retro Café Art Gallery Gift Certificate on Linda's Blog. Simply head on over and leave a comment on Linda's Post. Hurry, drawing on June 3rd!
 
Happy Creating! xoxo

Saturday, May 25, 2013

New Goodies and a Storewide SALE!

 
Happy holiday weekend everyone!
Come on over and see what's NEW in the shop. Lots of Prima, Cut-Outs, and two fabulous new Shrine Kits! You can check it all out HERE.

Sunday, May 19, 2013

New Goodies & More!

 
I hope you are all having a fantastic weekend! I'm super excited about all the wonderful BRAND NEW goodies in the shop! Lovely Mini People, German Dresden, Doll Head Paper Cuts, Stand Ups, a Keepsake Curio Shrine Kit, and so much more! You can see it all HERE!

 
The Mini People are ADORABLE and so perfect for several of our Shrine Kits! There are Mini Trees too!

 
The talented Shaun Sheehan created these sweet Mini House Shrines and made great use of the new Mini People and Mini trees. Aren't they just DARLING? And you've got to love the miniature bunting she created from Washi Tape. Wondeful Shaun!


And oh, the new Keepsake Curio Shrine Kit is perfect for holding your treasures! Maybe even use it to display your Mini House Shrines!
(Art Samples in the Curio by Kristin Hubick, Shaun Sheehan, and Debbie Moon.)
 
 
Speaking of treasures, Design Team Member Linda Cain created this GORGEOUS Blue Moon Shrine. You can find more photos and a complete Tutorial on Linda's Blog HERE!

 
I want to thank everyone who took part in the Mini House Shrine Swap! All of the houses have been swapped and they are all on the way to new homes. Some of you have already received them! Here is a photo of ALL of the houses. They totally rocked my world and I was BLOWN AWAY by all the talent. Each and every one was wonderful! AMAZING job everyone!!! Thank YOU!!!
 
If you would like to see more photos of the Houses, you can find them HERE on Facebook. AND in celebration of the successful Mini House Shrine Swap, Mini House Shrines and Mini Hutch House Shrines are ON SALE this week. You can stock up on them HERE. And don't forget to check out all the fun NEW goodies! Happy Creating! xoxo Kristin

Friday, May 10, 2013

Mini Mania!

 
Happy Friday friends! Lately, with all the fantastic Mini House Shrines coming through the door I've been in Mini Heaven! And of course one can never have too many Minis, so several new little wonders have been added to the shop! You can check out all the NEW goodies HERE. And be sure to stop by the Mini Section as well!
 
 
One of my favorite new goodies are these cube Alpha Beads. They make the perfect little feet or embellishments for our Mini House Shrine Kits and several of our other smaller Shrine Kits as well! In addition to the 6mm silver, we have several other colors available and even some numbers!

 
These fantastic Art Samples were created by the amazingly talented Debbie Moon! As you can see, Debbie did a great job utilizing the Alpha Beads in two different ways. Her houses are even more amazing in person!


Here is another awesome house by Debbie Moon. Isn't the paint brush "chimney" brilliant?
 
 
Our Mini House Shrine Swap is coming to a close and all houses are due on Monday May 13th. Don't forget to stop by our Facebook Page to see all of the samples, and why not try your hand at some of your own? We have plenty of Minis, Charms, and Beads for you to fill them with!

Saturday, May 4, 2013

New Goodies and a Mini House Tutorial

 
Hey everyone! We have some fabulous new goodies in the shop including 9 new Land of Enchantment Collage Sheets, Magical Moon Charms, and more! You can check it all out HERE!
 
Our Mini House Shrine Swap is well under way and I'm in love will all of the samples. If you don't already have your houses, it might be a bit late to join in the swap (swaps are due Monday May 13th), however you can still grab some just to make for fun. And they are FUN. Here are some lovely houses from the Retro Cafe Art Gallery Design Team!


Linda has a fabulous Mini House Shrine Kit tutorial that you can check out HERE.
 
Have a wonderful, creative weekend! xoxo