Thursday, November 27, 2014

Holiday SALE and a GIFT‏


Inspiration By Linda Cain!


I absolutely adore this gorgeous Christmas Keepsake Case by Design Team Member Linda Cain! You can find more amazing photos and the complete supply list in Linda's blog HERE.


Inspiration By Lynn Stevens!


Design Team Member Lynn Stevens made this stunning ornament using vintage star reflectors and our Statue Collage Sheet. The colors are just gorgeous!


Inspiration By Diana Darden!


This whimsical "Busy Dreaming" Female Bust is by Diana Darden! Her face is absolutely perfect Diana!


This stunning Tiny Fairy is by Sherry Matthews! The sentiment is absolutely perfect.
"Express Gratitude"

Saturday, November 22, 2014

Have Yourself A Charming Little Christmas‏


Charms! Charms! Charms! We've got em' and you're gonna love em'! This week we have TONS of new charms in stock, as well as awesome new Melissa Frances goodies. The new glass domes have so much awesome Christmas potential!

In addition to the new goods, the general Christmas Section has over 600 fabulous goodies (all on sale) and our Coffee Break Design Christmas Section is sure to inspire.


Inspiration By Amy Nieman!
  
This fabulous Deer Mount Ornament is by Amy Nieman! I LOVE that she used a funky face on the deer head, and went with some non-traditional colors. This would make a fabulous Christmas ornament, OR anytime ornament! So creative Amy!
(She Also Used Our Tiny Brown Deer, Glitter Jingle Bells, Metal Roses, Christmas Word Paper Cuts, Bakers Twine, and Heart Lock Charm)


Inspiration By Linda Cain!

I absolutely adore this fabulous Primitive Angel by Design Team Member Linda Cain! The halo is gorgeous, and Linda definitely shows off her painting skills on this one. And check out the "make-up" on her sweet angel's face! You can find the full details including the complete supply list on Linda's blog here!


Inspiration By Lynn Stevens!

Design Team Member Lynn Stevens definitely captured the magical and glittery side of Christmas with her stunning Votive Church Shrine. She's using our Church Shrines as a project for her art group so there will be lots more to come. This look almost good enough to eat Lynn! Gorgeous.
(She Also Used Our White Bottle Brush Trees, Glitter Snow, German Glass Glitter, and Battery Powered Votive.)


Inspiration By Laure Janus!

I was so excited when Laure Janus shared her adorable Tiny Fairy Shrines with me! She made them as gifts for her art group, and I'm sure they will LOVE them. Note how she turned them into pins! And using Mini Bottle Caps was such a brilliant idea. Even her backs are fantastic! These Tiny Fairies are a great little Christmas gift idea. Thanks so much for sharing Laure!
(She Also Used Our Tiny Fairy Head Paper Cuts, Diamond Glaze, Stickles, and Glitter.)


Baby It's Cold Outside!

Every now and then I like to pop in and say hi. The face behind the art supplies! I was winter coat shopping yesterday, and ended up with this bit of fluff, which was basically free (Horray for 50% off and Kohl's cash!). Anywho, I'm not sure what my face is saying, but my mind was thinking "Does this hood make me look fat?" Just making silly faces. I'm pretty much a goof ball most of the time. And now I'm a warm goof ball!


Speaking of bits of fluff, our 16 year old min pin, Zeus, is all set for winter too. He loves is "ugly Christmas sweater". For those of you that follow me on Facebook, I'm thrilled to report he's feeling much better! Nearly 100%!

Saturday, November 15, 2014

Staying Warm By The Fireplace Shrine and Faux Brick Tutorial‏


New Goodies!
  
Happy Saturday Everyone! It's starting to get chilly outside. Perfect weather for getting warm by the fireplace and crafting the day away. So why not craft an actual fireplace? Our new Fireplace Shrine Kit will have you feeling all warm and toasty inside! 
In addition to the new goods, the general Christmas Section has over 600 fabulous goodies (all on sale) and our Coffee Break Design Christmas Section is sure to inspire.


Art Time!

I had a blast playing with the new Fireplace Kit! As soon as I designed the Fireplace, I knew there had to be BRICK. And so the wheels started turning. I LOVE the way the brick turned out, so thought I would share with you!


Once my main piece was assembled (so easy!), I painted on one coat of white acrylic. I purposely let some of the Masonite show through as I was going for a distressed look. Keep in mind, your "grout" and brick can be any color you choose. Black would have been pretty cool too!


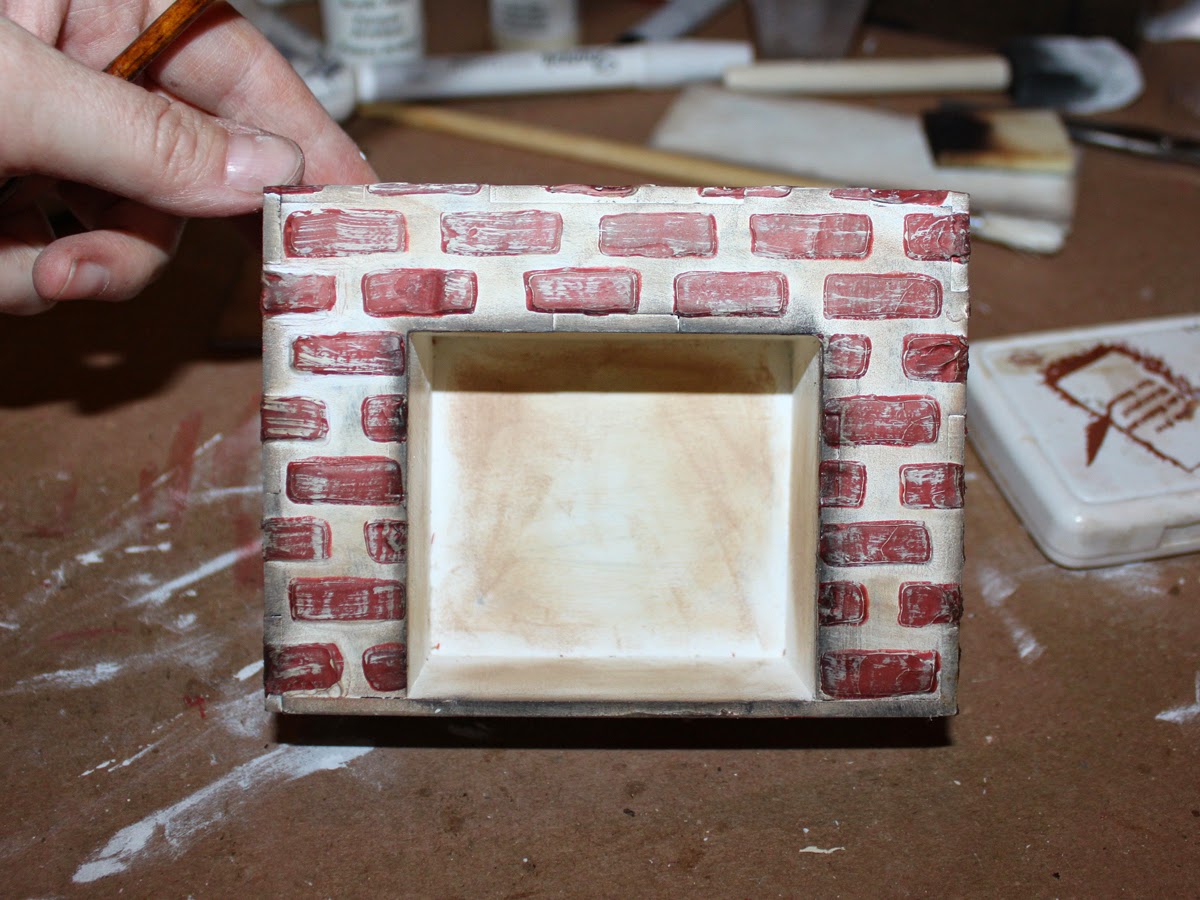
I knew I wanted my brick to be raised, to mimic the real thing, so I gave the Finnabair Modeling Paste a try. You can mix it with paint, so I added Oxblood. It looks sort of pink in this photo, however in person it's a lovely "brick red".


I simply placed my stencil over the fireplace, spreading the paste with a palette knife. The paste is thick and heavy, so once I started the stencil was pretty anchored. I still held it in place, but it didn't require much effort.


When you life your stencil, be sure to lift straight up. I did all four sides the same way, speeding up the drying time with my heat gun. This worked great and didn't harm the paste. I did a few touch ups using my acrylic paint once the paste was dry.


To create a distressed look, I first added some Sepia and Black ink to my white areas, and then dry brushed some cream acrylic paint over the brick. This is the point in which I fell in LOVE!


The distressing made all the difference!


Next I attached my base and mantel top.


The brick looks so cool! Even better in person, as you can really see the texture. TIP, when placing your stencil, line it up with the adjacent side. See how the bricks line up below?


I think lining up the brick really helps! Details!


Finally I added tons of Minis! TIP, once you cut the ornament hangers off of the "Merry Christmas" a touch of Christmas Red Stickles hides the cuts! I love the Chipboard Christmas Stockings. Of course I designed them for this kit, but they are also awesome on ATCs, Tags, Etc. I left mine raw (with inked edges) to mimic burlap :). I placed a battery powered votive candle in my fireplace. The candle slightly flickers, so it looks amazing! This would make a great gift for someone. The most creative candle holder they've ever seen!
We recently moved and found out that our new fireplace needs a major repair before we can operate it. At least I now have one working fireplace in the house! ha! Stay warm my friends! xo 


Inspiration By Diana Darden!
  
This gorgeous "Stories" Angel Articulated Art Doll is by Diana Darden! I adore her sparkly wings and of course her fabulous vintage lace skirt. Just stunning Diana!


Inspiration By Tracy Delisle!

I absolutely heart this Folk Heart Shrine by Tracy Delisle! The distress finish is spot on and the quote is perfect! Beautiful piece Tracy!


Inspiration By Linda O'Connor!

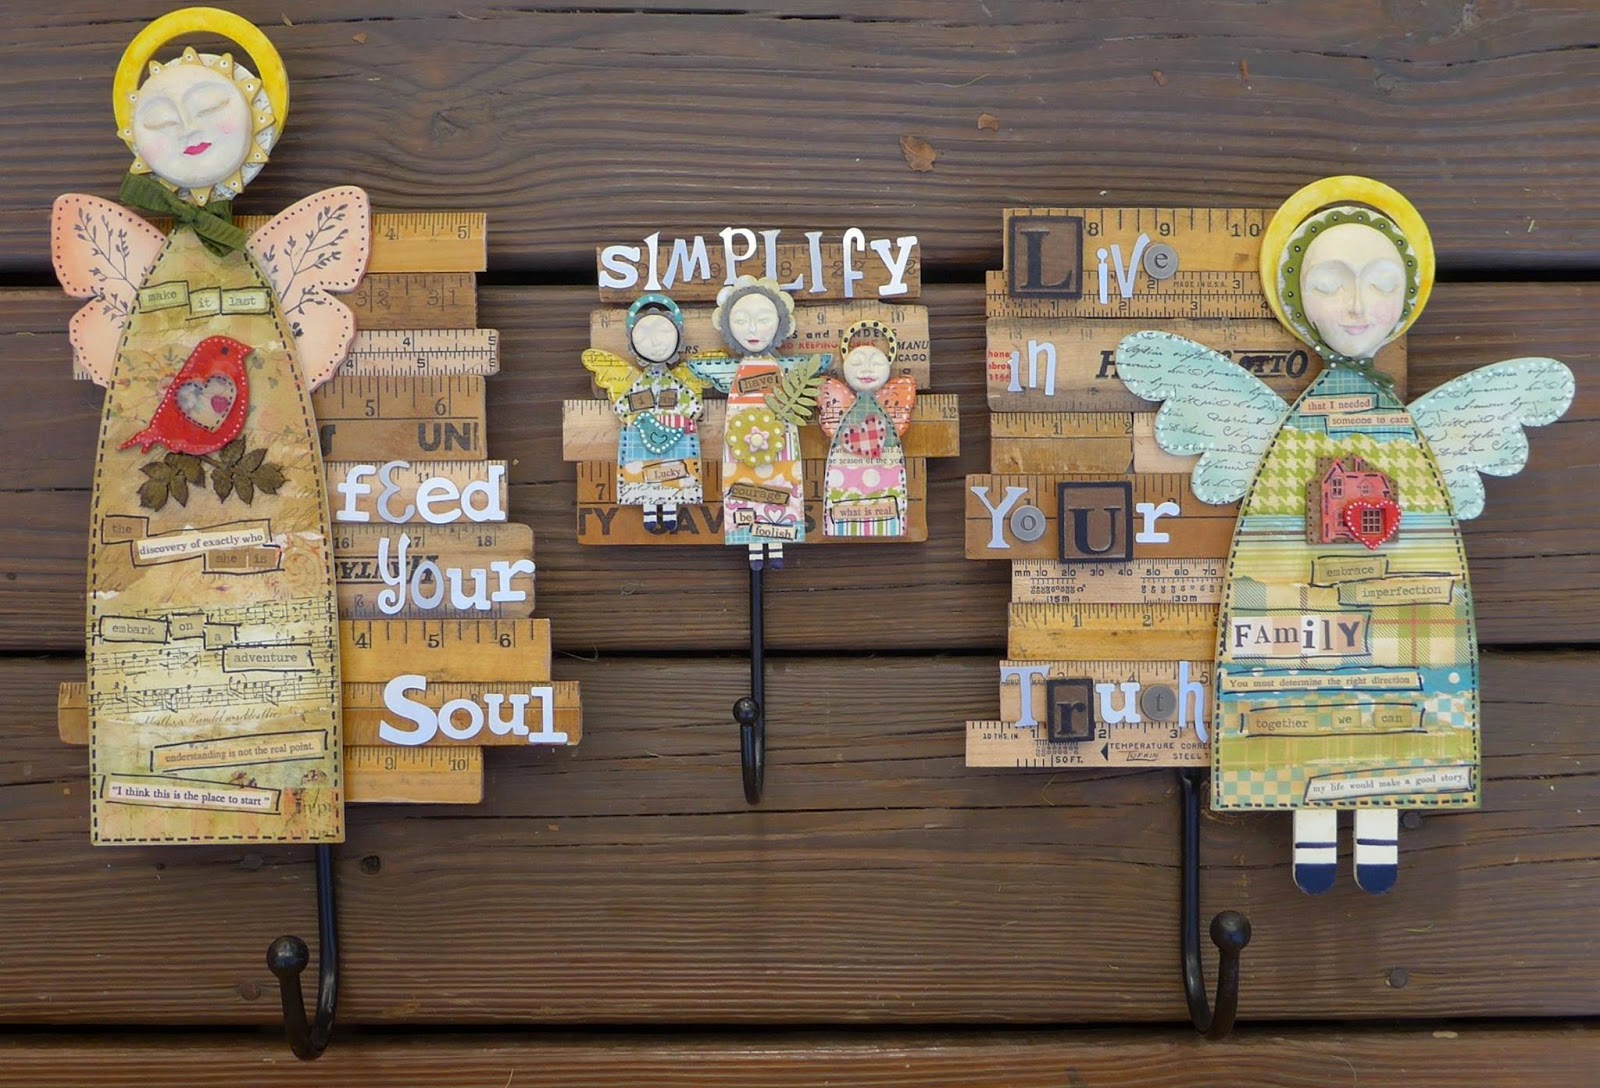
These fabulous Primitive Angel pieces are by Linda O'Connor! Of course I'm in love with her ruler bits and clay faces. These pieces are amazing and FUNctional! So awesome Linda!


Inspiration By Sherry Matthews!

Fairy Head Paper Cuts, Ballerina, Bottle Brush Trees, Gilders Paste (cream and gold), Finnabair Art Sugar, German Glass Glitter, Glitter Snow, Mini Baroque Frame Cut Outs, and Flat Backed Pearls. This piece is so magical Sherry!


Fun 2014 Christmas Tutorials!


Crystal Clear Keepsake Case. Find it HERE.


Deer Mount Ornaments. Find it HERE.


Primitive Angels. Find it HERE.


Fireplace Shrine Kit. Find it HERE.

Happy Creating! xoxo Kristin

Saturday, November 8, 2014

Crystal Clear Keepsake Cases and More‏


New Goodies!
  
Happy Saturday Everyone! I'm really excited about our new goodies, especially our lovely new Crystal Clear Keepsake Cases! They are available in two sizes and three different styles! Perfect for ornaments, displaying your treasures, and so much more! And of course there are tons of other new goodies too. In addition to the new goods, the general Christmas Section has over 600 fabulous goodies (all on sale) and our Coffee Break Design Christmas Section is sure to inspire.


Art Time!


These cases have so many possibilities! I immediately knew I wanted to create a winter wonderland scene, and use mine as an ornament. I just need to add a ribbon or wire to the top!


I started by using my VerDay paints on all the Masonite bits! Just be sure that you don't cover up the slots!


This is how the pieces turned out. I wanted to give them more of a frosted look, so I also added a bit of white acrylic paint, dabbed on with my brush.


Once my pieces were painted, I worked on the acrylic. Of course, you could leave them all clear, however I thought it might be cute to paper the back. You could also paper 3 of the sides as well. I was SO EXCITED when I found this tree paper. Perfect for my little winter wonderland.


Keep in mind you will be inserting your acrylic into the slots which are a perfect fit, so you will want to leave a 1/8" space on each edge. I used my acrylic as a template to cut my paper, and I simply left a 1/4" overhang before tracing. Done!


The very best way to attach paper to clear acrylic is using our crystal clear double sided tape and sheets. Incredi-sheets! It will look seamless and the bond is permanent. First I loosely cut a piece larger then my paper. Peel off one side and stick your paper to the incredi-sheet. Then cut around it. Then simply peel off the second side, and stick to your acrylic. Remember to leave the 1/8" on each end.


To glue in my sides, I put a few dabs of clear super glue on the bottom edge before inserting into the slots.


The paper I used for my background is double sided, so the back looks great too! That's the fun part about using the acrylic!


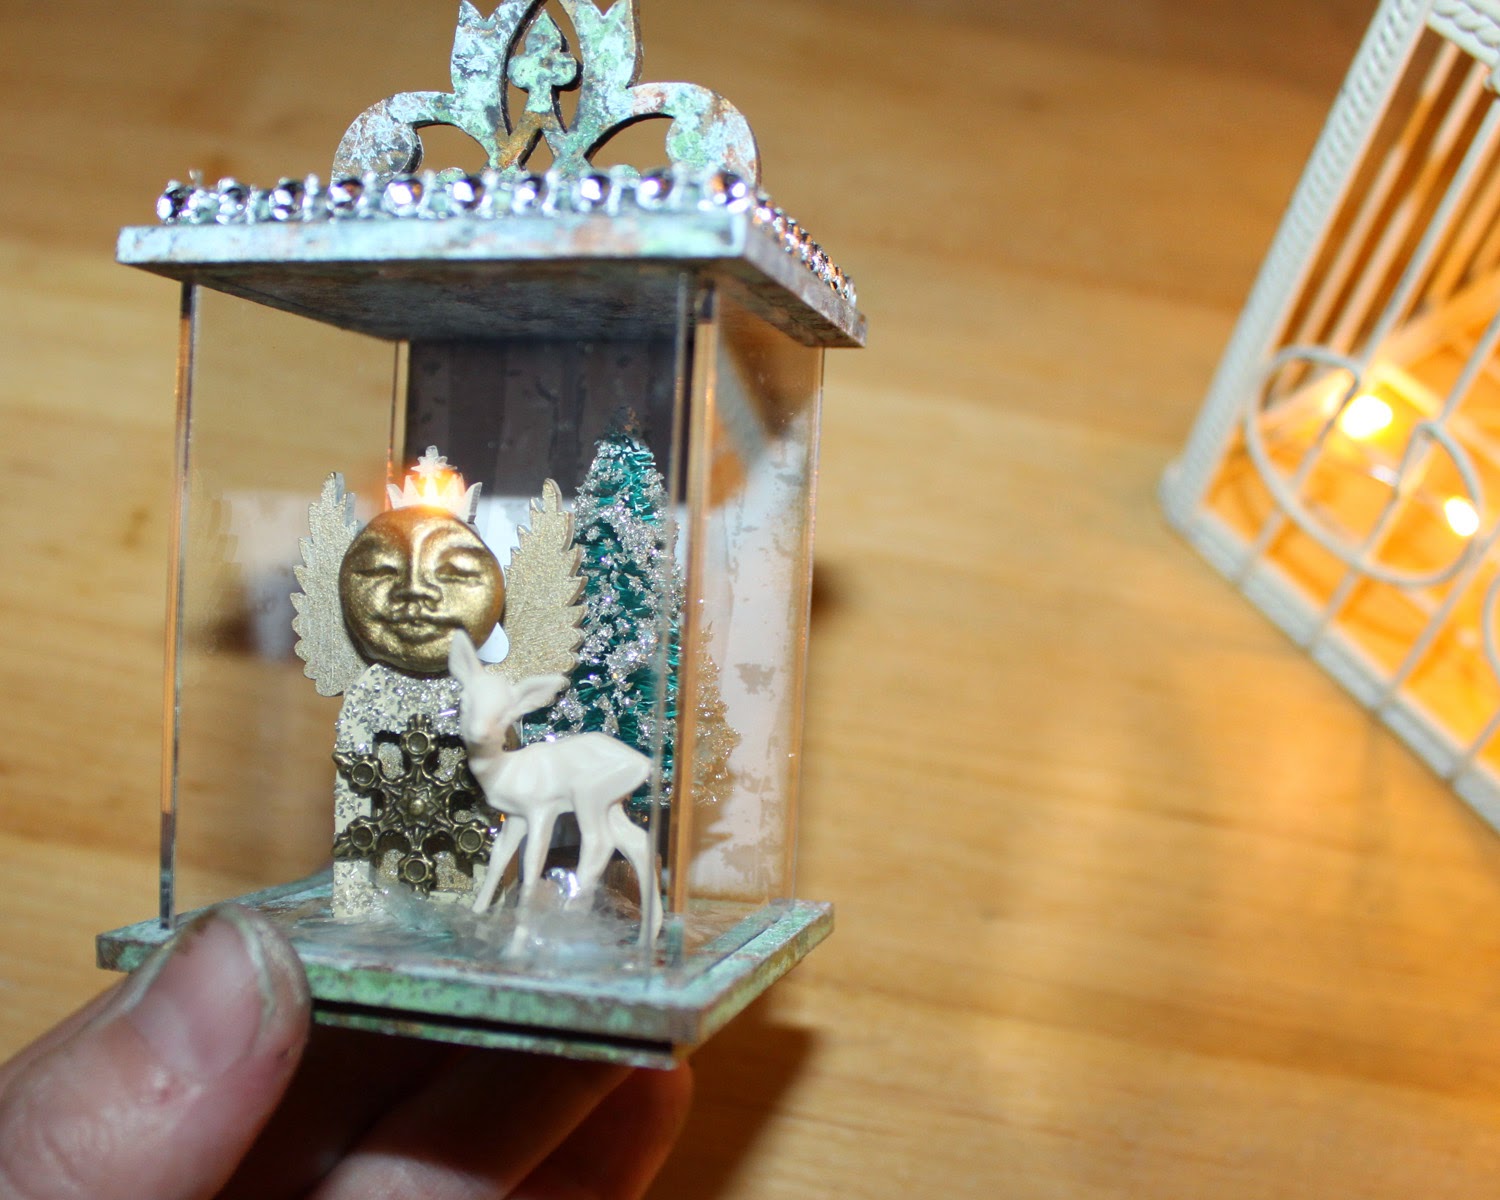
Remember those clay faces I made a few weeks ago? Well the tiniest one fit the Tiny Fairy Angel! I painted the face with gold acrylic paint, and the body of the angel with cream and gold. I added some glass glitter and a brass snowflake. She's so adorable!


Because one can never have too much sparkle, I also added glass glitter to my tree. I simply dabbed on some Matte Glue N Seal with my brush randomly, and then sprinkled the glitter over a paper plate. Don't forget to save the unused glitter. The plate makes it easy to slide the extra back into the container.


Next I glued my pieces to the bottom and added a bit of Mica. Again, I used the Glue N Seal. Dabbing it on and then sprinkling on the Mica Flakes. I also added Mica to my top after attaching. I glued in the other two sides using clear super glue.


I found it easiest to attach the top by flipping the piece over so I could see what I was doing. I used some tweezers to move the sides as needed in order to line them up with the slots. Once they were all lined up, I pressed down and it made a lovely "click" and that was that!


I finished the piece by attaching my topper and some faux rhinestone around the edge. The edge is also great for Dresden trim or real rhinestones! The edge in the design was no mistake :). When I was designing the cases I knew there needed to be an edge for bling! Ohhh... tinsel stems would be fun too!


I was also thinking the cases would be adorable mounted to a base. I would have loved to attach a vintage wooden sewing spool. Alas, I have none. The glitter is just to give you an idea :). Our box feet would be great too.


I'm loving the back and my double sided paper! A personalized photo might be nice too. Think Christmas Gifts!


It's so hard to show in photos, but between the glitter, mica, and acrylic sides, the light dances! Check out her "glowing" crown, reflected from the light to the right!


This is going to look stunning on my tree. I love the way the acrylic reflects. You can see the refection of the light in the photo, at the bottom of the deer's feet. It looks like the lights are inside! So pretty.


Inspiration By Sarah Lynch!
  
This sweet Dia De Los Muertos Rose Shrine is by Sarah Lynch. I love the wedding couple inside, and the mini pumpkins. Sarah gave this as a wedding present, of course! Love it Sarah!


Inspiration By Linda O'Connor!

This stunning Steampunk Shrine is by Linda O'Connor! I adore how she utilized so many pieces from our Scrap Packs. Those things are full of possibilities!
Go check out Linda's blog post for more cool photos. Linda's blog is amazing, so you might be there a while! Find it HERE.


Inspiration By Amy Nieman!

This sweet Nature Fairy assemblage is by Design Team Member Amy Nieman! I love how she used the Mushrooms, and now I'm thinking they might be fun in a winter or Christmas piece. Perhaps with a bit of Mica or Glitter? So sweet Amy! Thanks for the inspiration!


Inspiration By Denise Phillips!

It just wouldn't be Christmas without an appearance from Bubbie, the favorite deer of Denise Phillips! Denise used the Medium Baroque Frames for her piece as well as some Gilders Paste (all on sale!) and Holly. Bubbie sure does look festive. So fabulous Denise!


Fun 2014 Christmas Tutorials!

Crystal Clear Keepsake Case. Find it HERE.


Deer Mount Ornaments. Find it HERE.


Primitive Angels. Find it HERE.

Happy Creating! xoxo Kristin