
 I thought I would show you a fun way to emboss/UTEE Coffee Break Design Masonite Cut-Outs.
 For this project, I started with some Skeleton Keys and Crowns in Masonite. Masonite is so great because it's so durable! You can even bake it in the oven, which you will see!
.............................................................................................. First, I embossed one of my keys using bronze ink (just for fun) silver embossing powder, and a tiny sprinkle of aqua embossing powder. I was hoping for a nice "patina" look. I found it better to let my heat gun heat up a bit, and then blast it with the gun at close range. The powder did want to blow around a bit, but plenty stayed put. While it was still hot I sprinkled more and then heated again with the gun. You can do this as many times as you need too.
 First, I embossed one of my keys using bronze ink (just for fun) silver embossing powder, and a tiny sprinkle of aqua embossing powder. I was hoping for a nice "patina" look. I found it better to let my heat gun heat up a bit, and then blast it with the gun at close range. The powder did want to blow around a bit, but plenty stayed put. While it was still hot I sprinkled more and then heated again with the gun. You can do this as many times as you need too.
............................................................................................... The key was very sparkly when it caught the light. So as you can see, you can easily emboss the Masonite. I loved the key as is and you can certainly stop here, but I wanted to take it a step further!
 The key was very sparkly when it caught the light. So as you can see, you can easily emboss the Masonite. I loved the key as is and you can certainly stop here, but I wanted to take it a step further!
............................................................................................... I covered a few of the Masoite Cut-Outs with vintage paper, and colored one with Copic Markers. All of these pieces will darken quite a bit once we cover them with UTEE (Ultra Thick Embossing Enamel)! You could also use a clear embossing powder for this part, but the coverage won't be as thick.
 I covered a few of the Masoite Cut-Outs with vintage paper, and colored one with Copic Markers. All of these pieces will darken quite a bit once we cover them with UTEE (Ultra Thick Embossing Enamel)! You could also use a clear embossing powder for this part, but the coverage won't be as thick.
................................................................................................ I put all of my pieces in a plastic lid and completely covered them with UTEE. You want a nice thick layer so this was the easiest way.
 I put all of my pieces in a plastic lid and completely covered them with UTEE. You want a nice thick layer so this was the easiest way.
.............................................................................................. Gently lift them out of the lid and put them on a metal baking sheet lined with tin foil and then wax paper.
 Gently lift them out of the lid and put them on a metal baking sheet lined with tin foil and then wax paper.
............................................................................................... For this next step you can use a toaster oven or a standard oven. I used my standard oven. I preheated the oven to 340 degrees F and set the pan on the rack. I turned on the light, and it was WAY too much fun watching the UTEE melt. It only took about 4 minutes. What I LOVE about UTEE is that it basically self levels and creates a beautiful glass-like dome, similar to resin but in MINUTES. If you miss any spots on your pieces simply sprinkle on more UTEE while they are still warm, and put back them back in the oven. The second melt will only take a minute or so since the pieces are already warm, and again, the pieces will level. Repeat as needed.
 For this next step you can use a toaster oven or a standard oven. I used my standard oven. I preheated the oven to 340 degrees F and set the pan on the rack. I turned on the light, and it was WAY too much fun watching the UTEE melt. It only took about 4 minutes. What I LOVE about UTEE is that it basically self levels and creates a beautiful glass-like dome, similar to resin but in MINUTES. If you miss any spots on your pieces simply sprinkle on more UTEE while they are still warm, and put back them back in the oven. The second melt will only take a minute or so since the pieces are already warm, and again, the pieces will level. Repeat as needed.
............................................................................................... And here are my final pieces! The UTEE makes the paper underneath somewhat transparent. The small crown is a bit dark in the photo, but it has a beautiful tie dye look when the colors catch the light. Double click on the photos for a closer look! Just look at all the fantastic colors!
 And here are my final pieces! The UTEE makes the paper underneath somewhat transparent. The small crown is a bit dark in the photo, but it has a beautiful tie dye look when the colors catch the light. Double click on the photos for a closer look! Just look at all the fantastic colors!
............................................................................................. And the key, oh so beautiful! I might have a hard time using this one in a project. I may just hang on to it for a bit.
 And the key, oh so beautiful! I might have a hard time using this one in a project. I may just hang on to it for a bit.
...............................................................................................  Maybe just add a silk ribbon and keep it as necklace! The Masonite Cut-Outs are great for jewelry projects too.
 Maybe just add a silk ribbon and keep it as necklace! The Masonite Cut-Outs are great for jewelry projects too.
SUPPLIES USED:
Paper
Other Embossing Powders
Oven

 These keys in


 Next, I stenciled on some birdies using the
  I wanted to add some blue to the sky so I added a light wash of aqua using some watered down acrylic paint on a paper towel. Once that was dry, I used a lovely lady from the
 And here she is!
 For this next
  I quickly painted the frame with some aqua paint, and then after that dried, I brushed some white on top of the aqua to give it a "chippy" look.


 For this last
  First, I lightly painted the pieces with a cream acrylic.


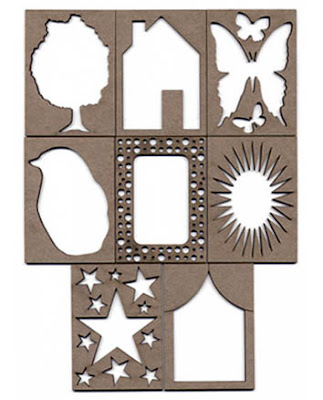 This next set, Fun Shapes includes: Tree, House, Butterfly, Bird, Holes, Starburst, Star, and Curtain Window.
  Speaking of window, we know you love the Original Coffee Break Design window circa 2009, so we added more! 2 Panes - 8 Panes, you are sure to find one to fit your needs.


