Saturday, April 25, 2015

SIX New Mini Framed Shrine Kits + a Tutorial‏


Happy weekend everyone! We some fabulous new goodies in the shop! Of course my favorites are the new Mini Ornate Framed Shrine Kits! I've had this idea swirling around in my brain for some time, so I couldn't stop at just one. There are SIX new designs, two each of three different sizes! Each Shrine is surrounded by a lovely ornate frame, perfect for displaying your art and/or treasures. You'll want them all! So I've put them on sale for you!
You can check it out HERE.

Inspiration By Sandra Evertson!

 I hope you're enjoying the RELICS & ARTIFACTS line by Sandra Evertson as much as I am! I just can't get enough! So I used them again this week!


Art Time!

Of course I had to play with the new Mini Ornate Framed Shrine Kits. I was especially excited that Sandra's Milagro Relics fit PERFECTLY! I thought it would be fun to do a trio of Shrines. They ended up looking like cool little museum boxes! These are extremely easy to create, so this tutorial is short and sweet!

 Supplies Used Mini Framed Shrine Kits, Sandra Evertson's Relics & Artifacts Milagros, 3" Candle Stick, Silver Faux Rhinestone Ribbon, Mod Podge, E6000.)


I wanted to show you how cool Sandra's Relics can be, even left in their original state. They look like authentic antique doll parts inside the Shrines!


Starting with completed Shrines, I sprayed everything with gold spray paint. I painted them outside, placed within a cardboard box for easy peasy clean-up!


I picked out my favorite body parts from Sandra's Milagros Set.


I cut pieces of paper for the backs of my Shrines. I liked the red, which reminded me of red velvet lined boxes. If I had red velvet, I would have used it!


I attached my Milagro pieces using foam dots (for a bit of lift) and trimmed the edges of the frame with silver faux rhinestone ribbon. And that's it! I kept this project pretty simple to highlight the beauty of the Milagros!


I may have to make three more!


Here's another fun project from last week.


And If you prefer even more bling, this tutorial is great too!


Inspiration By Cat Kerr!

A lovely Queen by Design Team Member Cat Kerr! I just love the bits of lace and tulle! Beautiful Cat!
Victorian Dollie Collage Sheet
http://www.retrocafeart.com/item_1690/Victorian-Dollie.htm
She Also Used Our Word Paper Cuts, Laurel Wreath Cut Outs, Paper Flowers


Inspiration By Tracy Delisle!

A stunning cross by Tracy Delisle. Absolutely beautiful finish Tracy
Large Exquisite Cross Kit Style 1:
http://www.retrocafeart.com/item_5216/Exquisite-Cross-Kit--Style-3.htm
She Also Used VerDay Paint Patina


Inspiration By Amy Nieman!
 
The most adorable little Dress Forms by Design Team Member Amy Nieman! She made them for a friend's wedding. They would make perfect magnets or pins. Fabulous idea Amy!
Dress Form Cut Outs:
http://www.retrocafeart.com/item_4870/Dress-Form-Cut-Outs--8-Pieces.htm
She Also Used Our Heart Skeleton Key Charms, White Half Pearl Trim, Paper Flowers


Inspiration By Brenda Harris!
 
Gorgeous jewelry pieces by Brenda Harris! The color really makes the Cameos Pop! So lovely Brenda!
Sandra Evertson's RELICS & ARTIFACTS Cameos Set: http://ow.ly/LCx39 

Saturday, April 18, 2015

New Exquisite Antiquity Shrine Kit + a Tutorial‏


Happy weekend everyone! We have several cool new goodies in the shop for you this week! I'm especially excited about the New Exquisite Antiquity Shrine Kit! I had a blast designing this kit for you, and I think it may be my favorite to date. The kit perfectly holds our Mini Santos Doll Kit as well as several of the RELICS & ARTIFACTS line by Sandra Evertson! It's a nice, large kit, which makes it extra fun!
You can check it out HERE.

Inspiration By Sandra Evertson!

 I hope you're enjoying the RELICS & ARTIFACTS line by Sandra Evertson as much as I am! I just can't get enough!


Art Time!

I had a blast playing with the new Exquisite Antiquity Shrine Kit and of course, more Relics! I love the larger size of this shrine, and the cool design! Since I went for more glitz and glam last week, I decided to do something a bit more primitive. Of course this kit would look great with tons of bling too!
 

Supplies Used Large Exquisite Antiquity Shrine Kit, Relics and Artifacts Flaming Hearts Ex Votos II, Black and Sepia Archival Ink, Matte Mod Podge, E6000, Red Stickles, Copper Beaded Chain, Brass Jump Rings, White Fancy Scalloped DresdenColor Dusters, White Sharpie Paint Marker

I absolutely love the way my Shrine turned out! It's even more striking in person.

I started by removing the eye screw from my Relic heart. Simply give them a few twists with some pliers, and you can unscrew them very easily! Initially I was going to glue my pieces to the back of the shrine, but then I had an idea! So I left the eye screw in the flame.

I gave everything a quick coat of acrylic paint using sponge brushes. I purposely let some of the Masonite show through on the shrine since I was going for an aged look.

I wanted stamping on my heart and flames, however they have amazing texture making stamping difficult, so I did the next best thing. I stamped on a piece of vintage sewing pattern tissue. White tissue paper would work just as well.

Coat the back of the tissue with Mod Podge, and GENTLY smooth over the heart. The tissue is very fragile, and can easily tear. Cut or tear the edges to remove the excess.

Coat the top with Mod Podge as well. This will make the tissue more transparent.

I did the same tissue technique to the flame, and then glued the two piece together with E6000. For fun, I added some Dresden around the seam and added some decorative dots to my shrine.

To give my Shrine more of an aged look, I brushed on some Sepia Ink around the edges using a Color Duster.

I decided to hang my heart from a bit of vintage chain. I simply drilled a small hole in the top of my shrine and added the chain, using a jump ring on the end to hold the chain in place!

Finally I attached my heart to the chain with another jump ring. I LOVE the look of the suspended heart, and it was super duper easy!

I can't wait to see what you guys make with new new Shrine Kit and of course the Relics & Artifacts. I know I'm having tons of fun! xoxo

If you prefer more bling, the tutorial from last week might be more up you alley!


Inspiration By Cat Kerr!

A stunning set of ATCs by Design Team Member Cat Kerr! The finishes are absolutely gorgeous Cat! 
Stop by Cat's blog for the full tutorial and supply list:
http://inthelightofthemoon.blogspot.com/2015/04/revamping-atc.html


Inspiration By Marie Garot!

We are completely over the moon about this fabulous shrine by Marie Garot! The details are fantastic! So magical Marie!
Moon Shrine Kit (with charm holes):
http://www.retrocafeart.com/item_3817/Moon-Shrine-Kit.htm
She Also Used Our Brass Wings, Brass Crown, Brass Hands, Star Cut Outs


Inspiration By Amy Nieman!
 
A beautiful journal page by Design Team Member Amy Nieman! The house and the doll are just adorable Amy!
Hello Dollie Bodies Collage Sheet:
http://www.retrocafeart.com/item_673/Hello-Dollie-BODIES-Doll-Collage-Sheet.htm
She Also Used Our Gelatos


Inspiration By Luci Brito!
 
These two incredible pieces were created by the talented Luci Brito. Luci has an amazing eye for color and phenomenal patience when it comes to applying her jewels! Gorgeous!
Large Steampunk Gear Shadow Box Shrine Kit:
http://ow.ly/LJ1BU
Sandra Evertson's RELICS & ARTIFACTS: http://ow.ly/LCx39
VerDay Paint and Patina Set: http://ow.ly/LJ1Ep 

Friday, April 10, 2015

Majestic Shrine Tutorial + More Relics and Artifacts‏ By Sandra Evertson


Happy weekend everyone! We have several cool new goodies in the shop for you this week! Two fabulous new Altar Shrine Kits, NEW Tim Holtz Stencils (and lots of others restocked), Collage Sheets, and a restock of the gorgeous RELICS & ARTIFACTS line by Sandra Evertson!
You can check it out HERE.


Inspiration By Sandra Evertson!

Sandra generously sent me even more beautiful photos to share with you, featuring her AMAZING art samples! All of the samples below were created by Sandra herself, using her incredible RELICS & ARTIFACTS line! Stunning samples and amazing photos! Thank you Sandra! xoxo


Art Time!

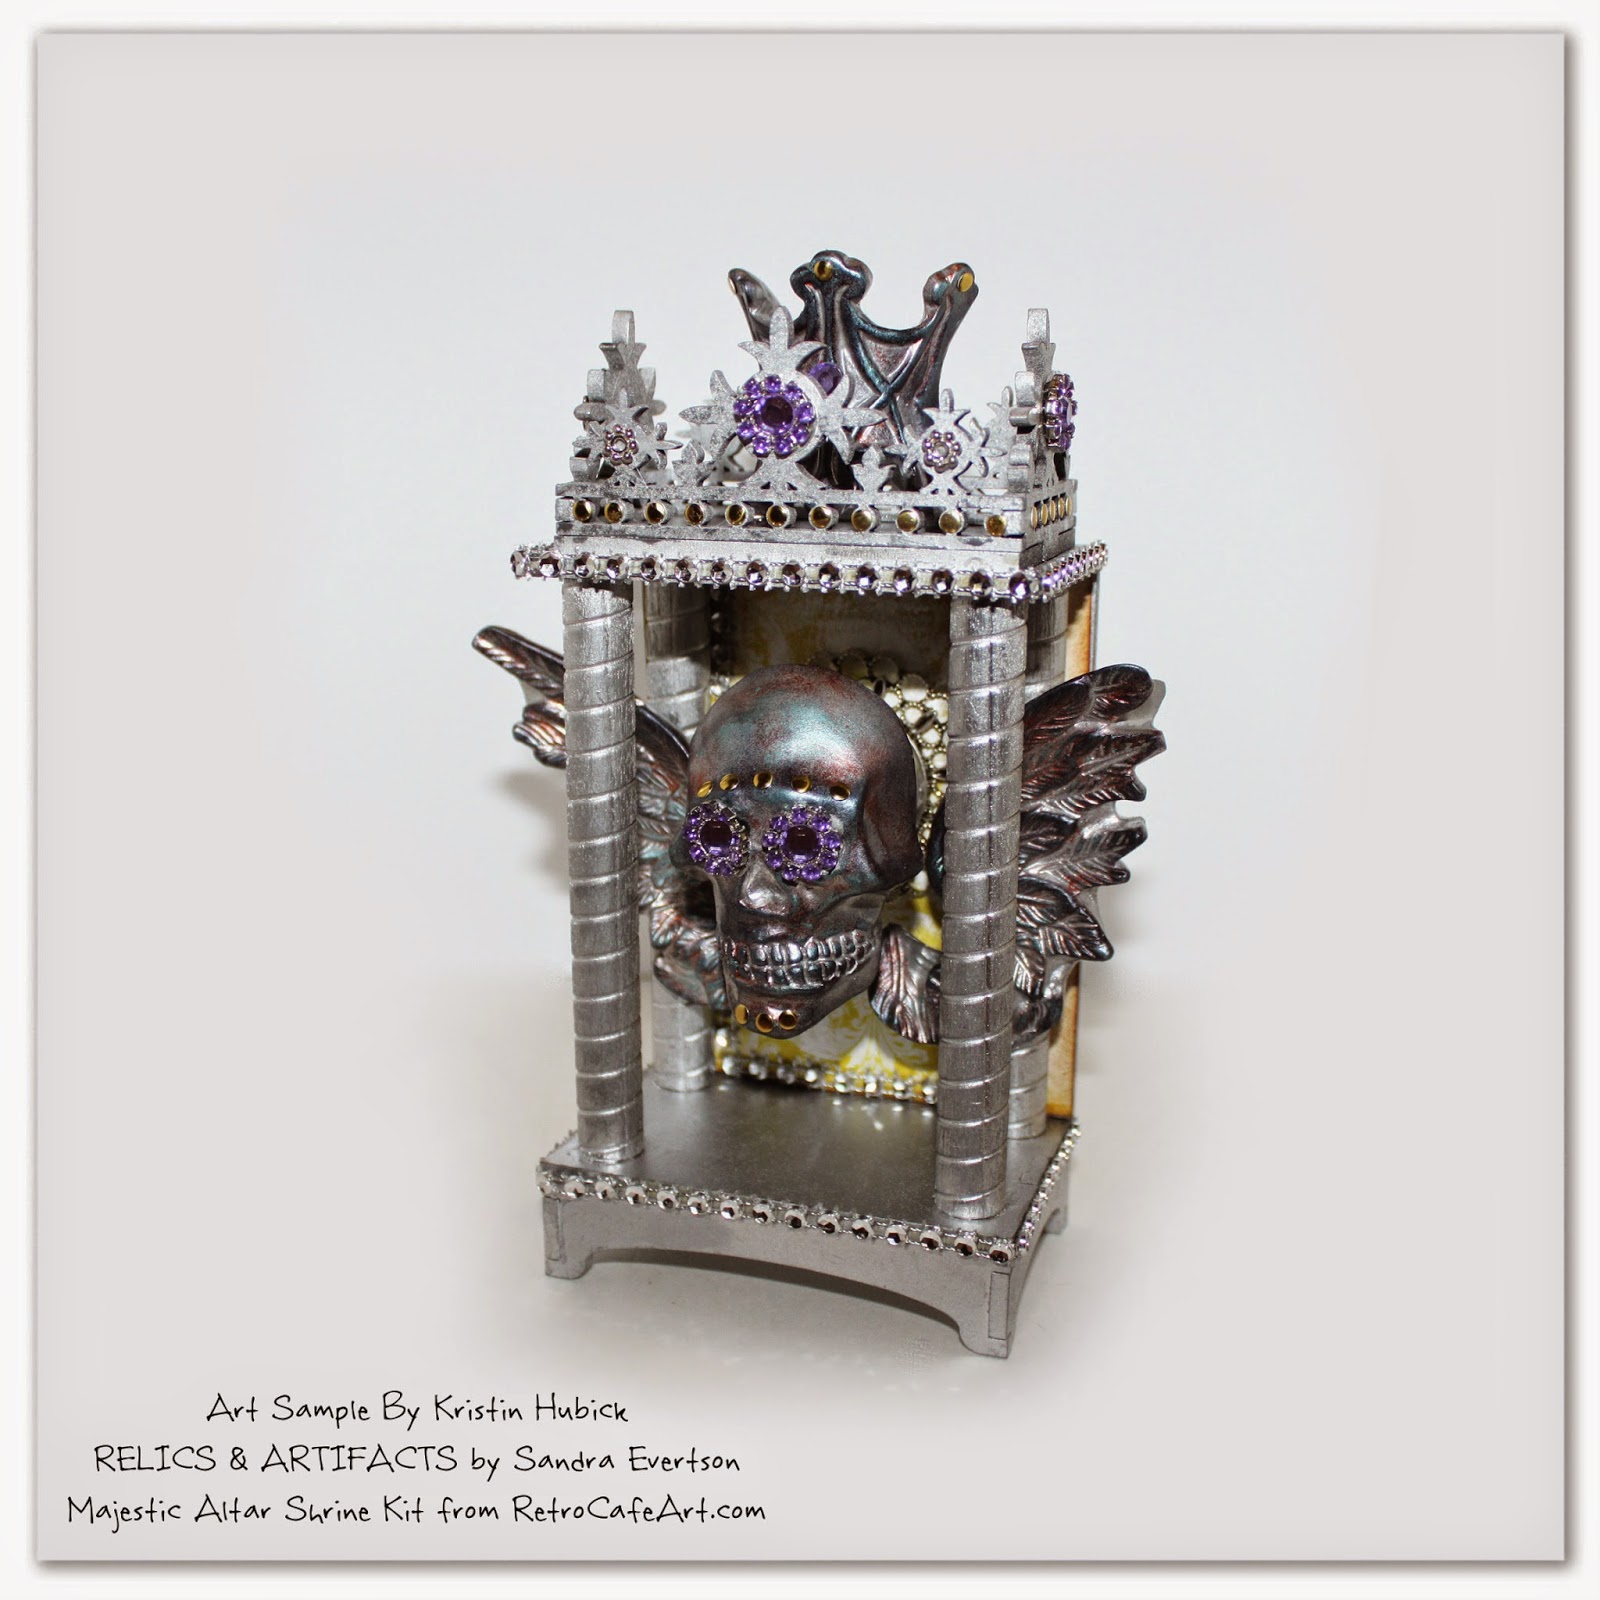
Of course I couldn't wait to play with the new RELICS and ARTIFACTS, just like all of you! I also knew from the very beginning how perfectly they would go with all of the Retro Café Art Gallery goodies. After designing the new Majestic Altar Shrine this week, I had to play with it too! I used the Ancient Soul Relics and Artifacts set, but so many others would work just as well! I think a heart would also be SO gorgeous!
 

Supplies Used Majestic Altar Shrine Kit, Relics and Artifacts Ancient Soul, Silver Faux Rhinestone Ribbon, Inka Gold Turquoise and Graphite, Black and Sepia Archival Ink, 3mm Tiny Brass Circles, Matte Mod Podge, E6000, Medium Unfinished Wood Spool, Antique Damask Collage Sheet


I absolutely love the way my Majestic Shrine turned out! It's even more sparkly in person!


I started by removing the eye screws from my Relics. Simply give them a few twists with some pliers, and you can unscrew them very easily! Sweet!


I gave everything a nice basecoat using Krylon spray paint in silver. TIP: Spray your pieces outside in a box for easy peasy clean-up. The Relics took the paint perfectly!


Next I added some copper acrylic paint here and there (applied with a sponge brush), followed by Inka Gold Turquoise and Graphite (applied with my finger) to the high points of the Relics. The intricate detail of the Relics makes them perfect for Inka Gold! Finally I darkened the pieces a bit by added some black archival ink.


Attaching some bling was my favorite part!


Tip: Use a small paint brush to move the tiny brass circles into place after adding a tiny dot of glue.


To create dimension with my Relics Skull, I attached a medium spool to the back with E6000, and then attached it to the back of my shrine.


The cool wings were attached to the back pillars of the shrine using E6000. The wings have a flat back, making this really easy.


I finished things off by adding more bling, attaching the Relics Skull, and finally attaching the Relics Crown to the top of my shrine.


I almost forgot to mention, I attached the image from the new Antique Damask Collage Sheet to the back of my shrine. I love the little pop of yellow, especially with the purple rhinestones!


I hope you enjoyed this project! As always, feel free to use any of our tutorials while creating. I can't wait to see what you make! xoxo


Inspiration By Brenda Harris!

A spectacular collection of Primitive Angels created by Brenda Harris! I especially love the bright, happy, springtime colors found on "Plant Dreams". Beautiful Brenda!
(She Also Used Our Fairy Head Paper Cuts, Music Sheet Heart Paper Cuts, Word Paper Cuts)


Inspiration By Gerri Herbst!

A super sweet Easter tag by Design Team Member Gerri Herbst! How perfect is her little bunny!
(She Also Used Collage Sheet SC38, Tiny Plastic Blue Eggs, Stickles)


Inspiration By Amy Nieman!
 
A beautiful, inspiring journal page by Design Team Member Amy Nieman! Just loving the pops of black and white! And of course the way she used her Finnabair Stamps!
(She Also Used Our Heart Washi Tape and Gelatos)


Inspiration By Linda Cain!
  
It's time for Design Team Member Linda Cain to ruffle your feathers! Hop on over to Linda's Blog to see her lush Mica Feathers! My favorite is the feather she covered in GLITTER! 
Check it out HERE.
(This technique would look GORGEOUS on the RELICS & ARTIFACTS!)


Inspiration By Tristan Robin Blakeman!

A fabulous Shrine by Tristan Robin Blakeman! So many incredible details Tristan! WOW! He certainly took the Regal Altar Shrine to new heights! Gorgeous!
(He Also Used Our Black Faux Rhinestone Ribbon, Tim Holtz Mini Chain Tassels, and Pink Chandelier Garland)